Now Reading: Create a snowy Christmas miniature village in your freezer.
- 01
Create a snowy Christmas miniature village in your freezer.

Step-by-Step Guide to Creating a DIY Snowy Christmas Village in a Freezer
As the holiday season approaches, many are on the lookout for creative ways to celebrate Christmas. One trending idea is a Christmas-themed snowy miniature village in a freezer. This whimsical project offers a fun and inventive way to showcase your Christmas spirit. A DIY realistic miniature snowy Christmas crib brings festive cheer to your home, combining creativity with holiday magic. Ideal for all ages, this DIY project is the perfect way to add a personalized, frosty touch to your Christmas decor.
This idea first came to me years ago during my bachelor days. At our company quarters, we often kept beer in the freezer to enjoy it chilled during the summer. After removing all the bottles, the inside of the freezer resembled an Antarctic landscape. That image sparked the idea of creating a snowy scene with roads, hills, and a car. While it remained just an idea back then, I’ve now brought it to life through this creative Christmas crib project, turning it into a “Snowy Christmas Miniature in a Freezer DIY.
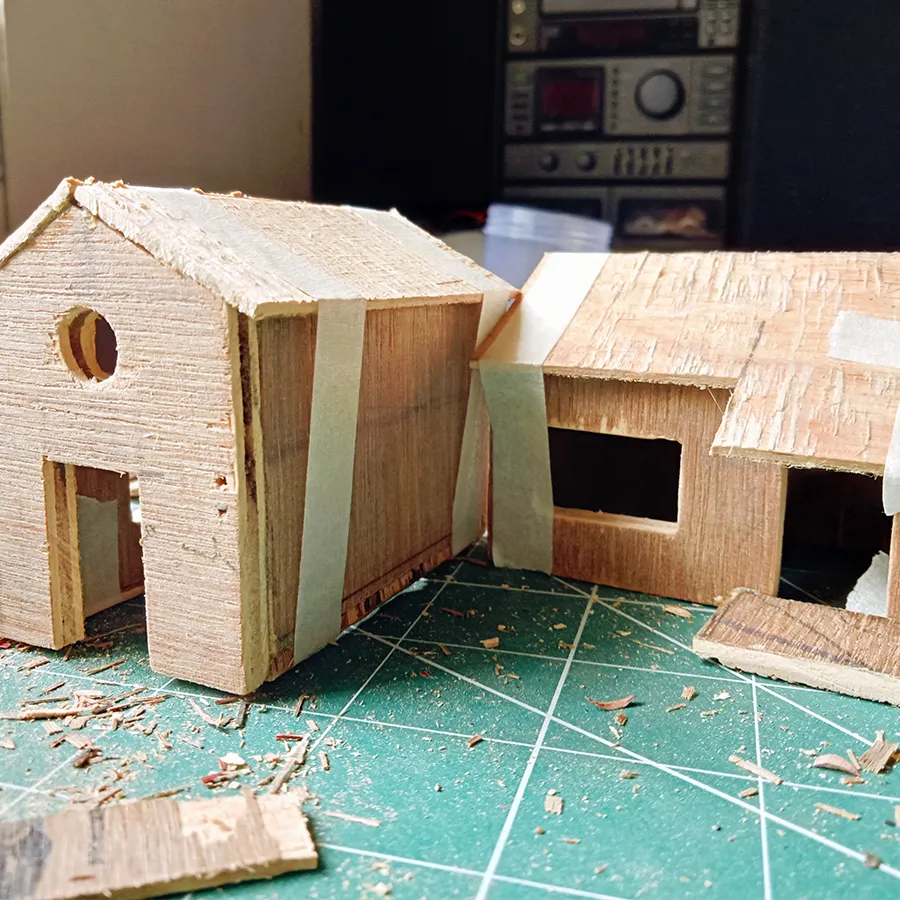
Crafting a Miniature Log House
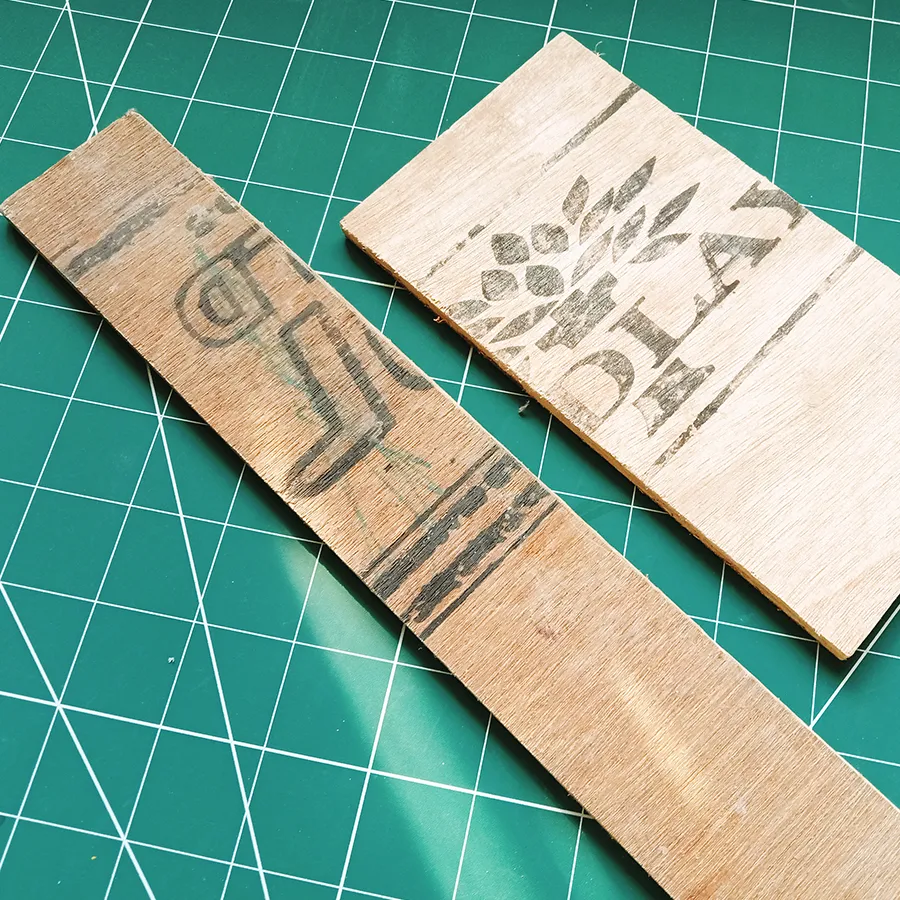
Since the height of my freezer is 32×12 cm, I designed the house to be 10 cm tall to fit within the space. To create a realistic miniature log house, I chose 5mm thick plywood for the walls. My goal was to capture the charm of a snowy Christmas night, complete with the cozy glow of a house in a winter landscape. It was both challenging and experimental, as it was my first attempt at this kind of project.


I created the door by cutting the plywood with a hacksaw and a cutter. For the windows, I initially drilled holes, then inserted a blade, and carefully cut them into the desired window shapes. Finally, I smoothed the edges using a wood-filing tool for a clean finish.


I fixed the walls using synthetic glue and secured each intersection with a single nail for added stability. For the roof, I used a face veneer, the top layer of the board, to achieve a realistic finish with textures.
Creating veranda railing and installing window glass

I chose matchsticks to create the veranda railing and pillars. The combination of the plywood texture and matchsticks looks incredibly realistic. Since super glue didn’t work well with matchsticks, I used synthetic glue instead, which made the arrangement a bit challenging until it solidified.


I cut a 1mm thick semi-ground glass and shaped it to fit the window size. To make it look more realistic, I added extra glue around the inside corners of the window.
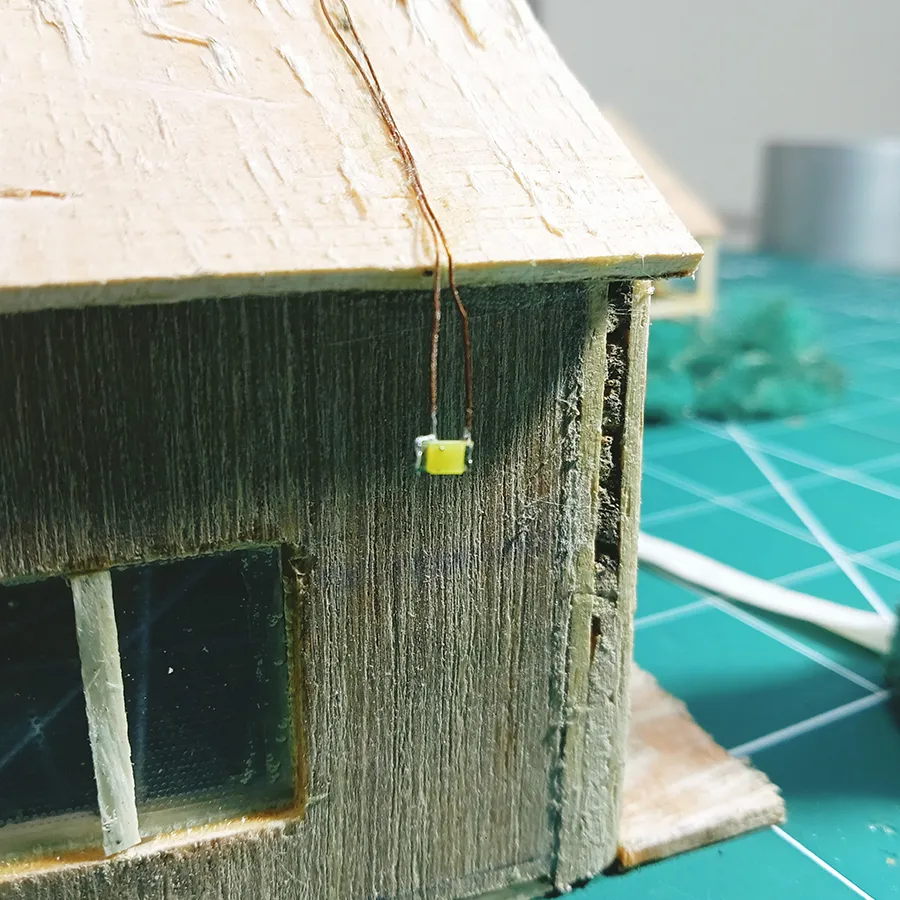
Installing LED lights in the miniature house for freezer Christmas village scene

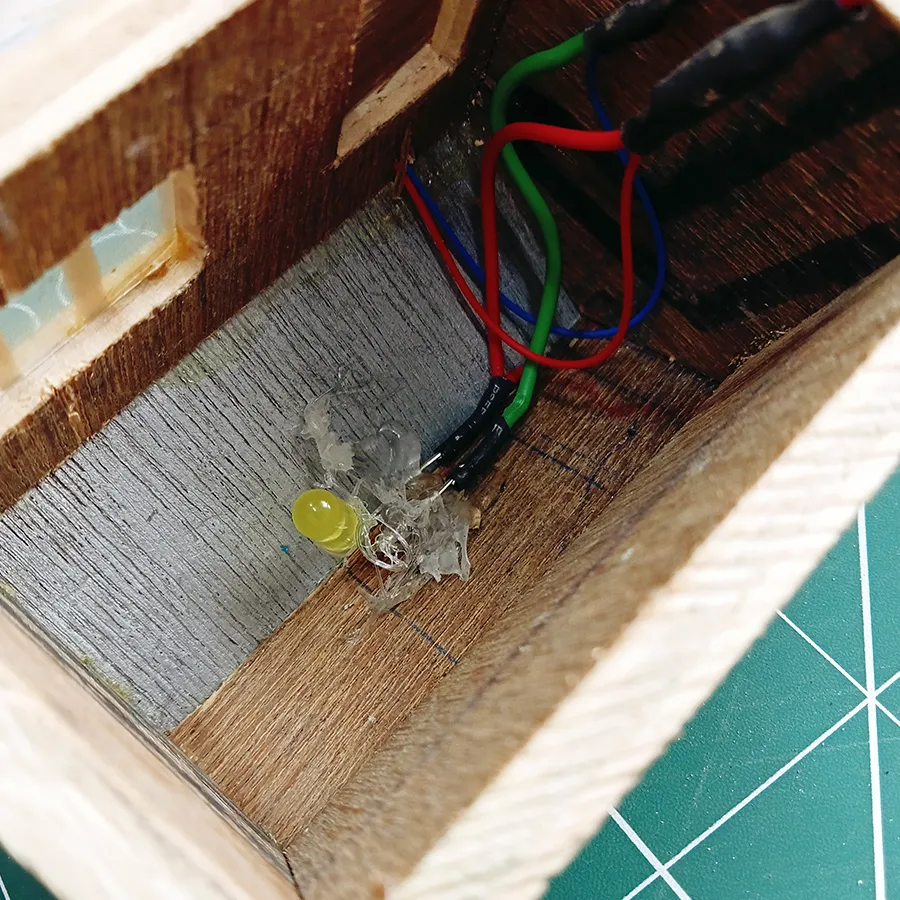
I installed an LED light under the roof for veranda using a 1206 SMD LED with a 330-ohm resistor in series to reduce the brightness. I also fitted a 3mm yellow LED bulb inside the house. The idea for this project came about unexpectedly, just three days before Christmas. I wasn’t sure whether snow would form on the miniature models I had created after installing them inside the freezer; it was just an experiment. And I didn’t purchase anything specifically for this project. Everything I used was from my collection, and a few household items.
Crafting the Christmas tree and garden


The Christmas tree was made from a dishwashing scrub sponge, which provided the perfect shape and texture to resemble a realistic tree. I created six circular shapes, then stacked and glued them together to form a cone. Once assembled, I added an SMD LED with a star at the top. For the wiring, I used insulated wire repurposed from a speaker coil.

Finally, I applied dots of white and red acrylic paint on the surface of the tree using a matchstick to resemble ornaments. I wasn’t sure how it would turn out once the snow was created on it.
Icy Christmas miniature scene in a freezer—crafting a miniature tree


For this “Christmas-themed snowy miniature village in a freezer,” I wanted to add a tree behind the houses that could also hold the weight of the snow. To create it, I repurposed a dishwashing steel scrub, dipped it in green acrylic paint, and shook it well to ensure the paint covered the entire surface, forming a sturdy and festive base.


For the trunk and branches, I used binding wire, cutting several pieces and tying them together with masking tape to form the tree trunk and branches. Although it didn’t resemble a real tree, I hoped it would look better once the snow covered it. To create a detailed garden, follow these steps.
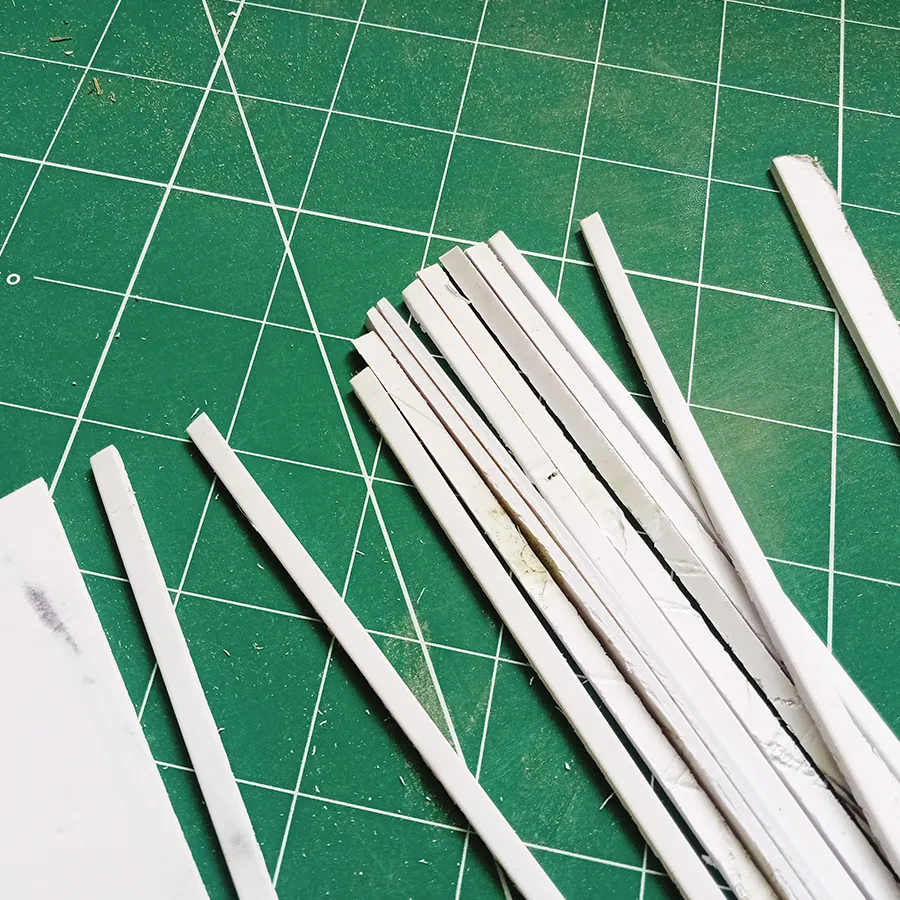
Crafting a miniature fence for Snowy Miniature Christmas Scene
For the fence, I used a 3mm foam sheet and cut it into 3mm width strips. Using super glue, I stuck the strips together to create a fence. Later, I painted it with a mix of brown, black, and white acrylic to achieve a realistic wood texture. Be careful when using super glue. It’s better not to use it with bare hands; using a tweezer or nose pliers would be a safer choice.


Crafting miniature Christmas star
At the final stage of a Christmas-themed snowy miniature village in a freezer, I hung a star inside the miniature house using an SMD 1206 LED soldered to an insulated wire. To reduce the brightness, I added a 330-ohm resistor in series with the LED. For the star, I used a hot glue stick, sliced it into 2mm thick pieces, cut it into a star shape, and then painted it. This creative touch added a magical glow to the scene, completing the festive miniature project.


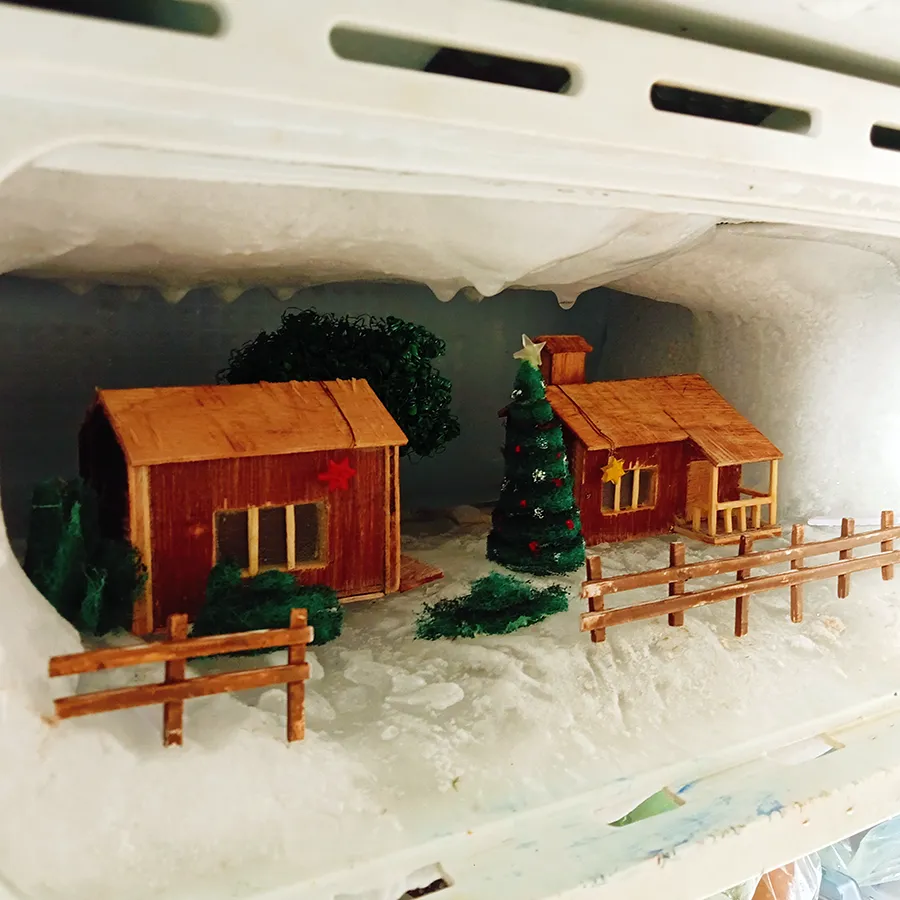
Final snowy Christmas miniature installation inside freezer
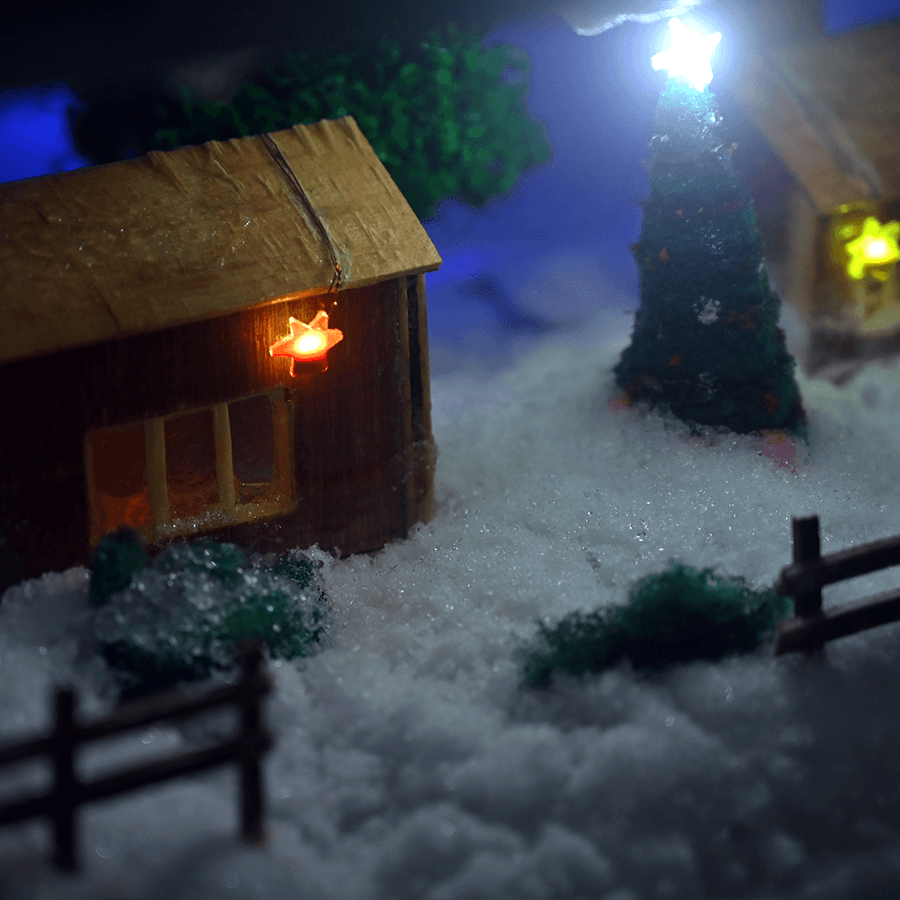
It was so interesting and curious once I placed all the miniature items inside the freezer. It looked incredibly realistic and gave a mesmerizing feel. I completed the project in one day, starting at 9 AM and finishing by 11 PM. Before placing the models, I turned off the freezer an hour earlier so the ice would melt, and later created a flat surface using a knife to place the houses and trees. (Note: Be careful when using sharp tools to scrape the freezer box, as damaging it could lead to gas leakage and cause the cooling to stop working. Please make sure to turn off the refrigerator while setting up the installation.
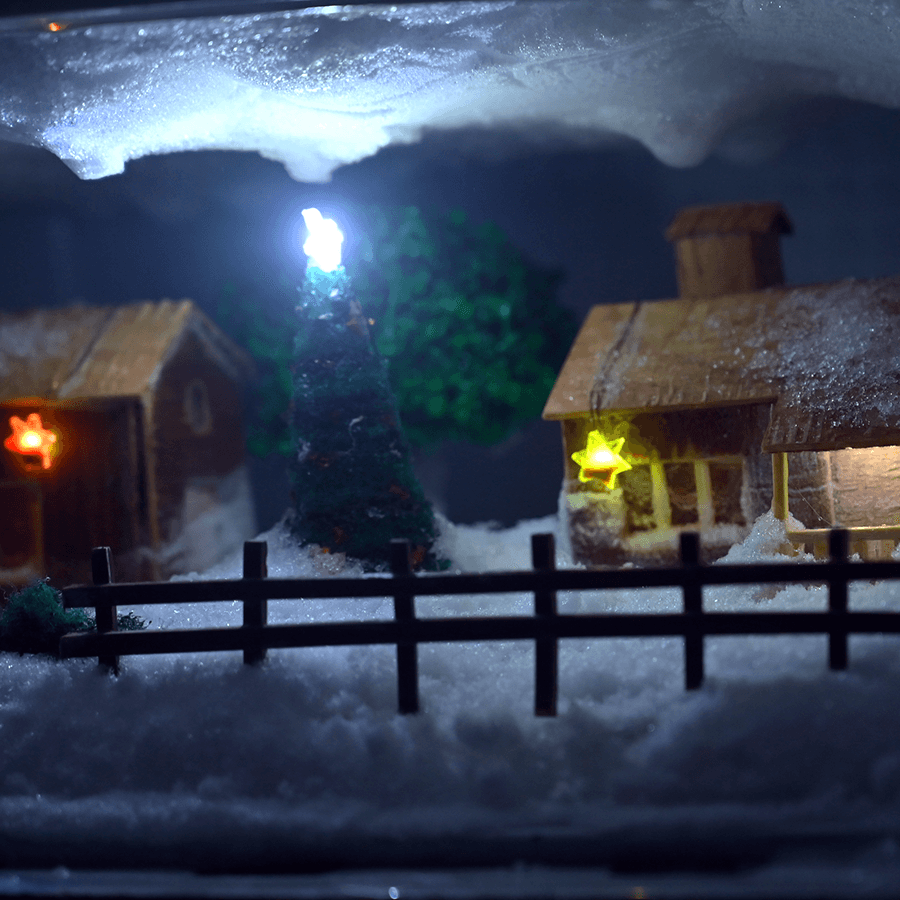
Christmas-themed snowy miniature village in a freezer—final output Final output
I added a blue LED light in the background to create a bluish sky and backdrop. This is the result I achieved after a day. However, some effects didn’t turn out as I expected, such as mist covering the roof. Instead, I scraped ice powder from the top area of the freezer box. Overall, the outcome was interesting, though my freezer might be a bit older and not functioning well enough to form ice on the roof as planned. Let’s tweak once again for better result 😊.
Happy Christmas

Happy Christmas
Stay Informed With the Latest & Most Important News
Previous Post
Next Post


Hi, I’m Krishna Kumar (CrishCreative), a seasoned graphic designer with a professional background in branding and advertising. My passion lies in blending art and science to craft innovative ideas and strategies that leave a lasting impact. I am currently working as a creative director.Beyond work, I immerse myself in art, crafting, photography, and hands-on projects—whether it’s tinkering with electronics, exploring mechanical builds, or diving into creative crafts. Driven by curiosity, I’m always learning, discovering, and finding inspiration in the unexpected. For me, every challenge is an opportunity to grow, spark fresh ideas, and create something meaningful.