Your cart is currently empty!
Category: PROJECTS
Welcome to the PROJECT section! Here, we showcase a variety of creative pursuits and projects, along with in-depth insights into each one. Our goal is to inspire and support fellow enthusiasts, and we hope the content here sparks your passion and helps guide you on your own creative journey.

Resistor storage and dispenser
DIY simple resistor dispenser and storage sack
Resistors are essential components in any electronics project. They play a crucial role in regulating voltage and current, ensuring that your circuits function properly. Whether you are a hobbyist, a student, or a seasoned professional, keeping these tiny components organized shouldn’t be a hassle. This simple DIY resistor dispenser and storage solution can be a game-changer, helping you keep your resistors neatly organized and easily accessible.
Handling resistors while prototyping or working on circuits can be a real hassle if they’re not easy to access. I used to struggle with the same issue, so I decided to make my own resistor storage that’s both simple and affordable. Sure, there are plenty of options out there, but they’re often expensive and take up way too much space. So, I came up with a DIY solution that works perfectly for me, and now I’m excited to share it with you! Follow along, and I’ll show you step by step how to make your own resistor dispenser and storage setup.
Medicine storage bottle to handy resistor dispenser
I use a compact plastic medicine or tablet container to store 1/4 watt resistors, which I purchased from Amazon.in for around ₹300. The container is 6 cm in height and 3 cm in diameter, with a convenient twist-to-open and close lid. It’s easy to find in the market, affordable, and incredibly handy as a dispenser.
Product Link: Medicine Organizer Bottle

Create a dispensary hole in storage container
The best thing about this storage container is how easy it makes grabbing one resistor at a time. Just give it a little shake, and a resistor pops out through the opening in the cap—super simple! If you don’t need it right away, you can easily put it back in the same container. It’s a total time saver and keeps everything neat and hassle-free. Perfect for staying organized without any extra effort.


I used a hot soldering gun to make a 3mm hole in the lid. I warmed up the soldering gun, pressed the tip gently on the desired spot, and melted the plastic to create the hole. Then, I cleaned up the edges by twisting a 6mm drill bit by hand to remove any excess melted plastic.
Designing the informative label for resistor dispenser and storage solution
I designed the label to be detailed and maximum informative, keeping in mind it should be a practical and beginner-friendly solution in electronics to remember the color code. The label includes the resistor value (with units), color bands, band type, tolerance, band colors with numbers, an identification diagram, and also Ohm’s law equations. Since the container is cylindrical, I printed the design in a two-up format, ensuring the information is visible from multiple angles.

Printing durable label stickers
I printed the label design on a durable, non-tearable PVC sticker sheet (120 gsm) in A3 size. The design includes cutting marks to make it easy to cut each label individually. All the labels fit neatly onto two A3 sheets, with each label measuring 10 x 3.9 cm—perfect for a wrap-around application. The printing charge was ₹90 for two A3s. A downloadable PDF file for print is available at the end of the blog.

Pasting label around the bottle
I started by gently cutting the PVC sticker along the crease marks using a steel ruler and a sharp knife. I was careful to only cut through the sticker itself, leaving the backing paper (liners) intact. Once I had all the individual labels neatly cut from the A3 sheet, I peeled them off one at a time and applied them to the bottles.
Applying the labels around the bottles can be a bit tricky, but here’s a tip that worked for me: I used the bottle’s molding seam as a guide. By aligning the right edge of the label (the overlap area) with the seam, I could ensure a clean and precise finish that lined up perfectly on the other side.
This step-by-step approach made labeling smooth and hassle-free, leaving the bottles looking neat and professional!


Preparing the resistor to load into the dispenser
I trimmed the leads on both ends of the resistors and separated them from the bundle, making sure each resistor was straight and firm. Bent resistors can cause jams and won’t dispense smoothly. This plastic storage container is a great choice for organizing resistors; it keeps dust and moisture out, ensuring your components stay clean and dry. Plus, during prototyping, any unused resistors can easily be reloaded into the bottle after straightening. It’s a convenient and efficient way to store and dispense resistors for electronics projects!


Creating the perfect rack for resistor dispenser and storage
Designing a rack to organize my dispenser bottles turned out to be more challenging than I expected. I experimented with a couple of methods, but neither worked out as planned.
First, I thought of cutting PVC pipes to match the size of the bottles and arranging them in a beehive-style pattern. Unfortunately, finding PVC pipes that fit the plastic bottles perfectly proved to be a struggle, so I had to scrap that idea.
Next, I considered creating a true honeycomb structure by cutting 1 mm transperent PC sheets into hexagonal shapes and assembling them into a beehive pattern. While it seemed like a creative solution, the amount of time and effort it required made me rethink the plan. So, I set that idea aside too.

After extensive research and plenty of trial and error, I settled on a simple yet budget-friendly solution with the acrylic sheet.
Laser-cut acrylic storage racks
I designed custom panels for a sleek and compact resistor storage rack, consisting of 29 panels in total, with an overall size of 27×38 cm. Due to the complexity of the design, I opted for laser cutting to avoid the difficulty of cutting it manually. The CNC laser cutting service charged just ₹800 to cut all the panels, making it an affordable and efficient solution. The finished rack is not only elegant but also versatile—it can be mounted on a wall, placed on a table, or even laid flat for easy access. Below are the laser-cut panel pieces.

Guide to assembling panels
Here’s below a quick demo of how I assemble the panels!I made sure to include a small clearance gap of about 0.2 to 0.3 mm at each panel joint during the design process, which helps make the assembly smooth and hassle-free. When putting it together, I only need to glue the outer panels and the label strip—everything else just slots in perfectly! For the panel connections, I used strong PVC glue to ensure everything stays securely in place.

Giff (Video to Giff ) is created using https://ezgif.com/
Applying resistor labels on the rack
The rack is designed to hold up to 63 compact dispenser bottles, making it perfect for organizing components. I’ve chosen 56 popular general-purpose 0.25W resistor values to store in these bottles, leaving 7 slots available for rare, random, or less commonly used resistor values.


Dispensing individual resistors from the container
This handy dispenser is designed to release one resistor at a time with precision. Simply flip the bottle upside down, give it a gentle shake, and a single resistor will slide out, allowing you to easily pull it out.

Downloadable assets for resistor dispenser and storage project
If you enjoyed this post and are excited to create your own resistor storage and dispenser system, you can download the necessary files below. Happy tinkering! 😊 Download: Resistor dispenser label on A3 sheets and Acrylic Panels


Create a snowy Christmas miniature village in your freezer.
Step-by-Step Guide to Creating a DIY Snowy Christmas Village in a Freezer
As the holiday season approaches, many are on the lookout for creative ways to celebrate Christmas. One trending idea is a Christmas-themed snowy miniature village in a freezer. This whimsical project offers a fun and inventive way to showcase your Christmas spirit. A DIY realistic miniature snowy Christmas crib brings festive cheer to your home, combining creativity with holiday magic. Ideal for all ages, this DIY project is the perfect way to add a personalized, frosty touch to your Christmas decor.
This idea first came to me years ago during my bachelor days. At our company quarters, we often kept beer in the freezer to enjoy it chilled during the summer. After removing all the bottles, the inside of the freezer resembled an Antarctic landscape. That image sparked the idea of creating a snowy scene with roads, hills, and a car. While it remained just an idea back then, I’ve now brought it to life through this creative Christmas crib project, turning it into a “Snowy Christmas Miniature in a Freezer DIY.
Crafting a Miniature Log House
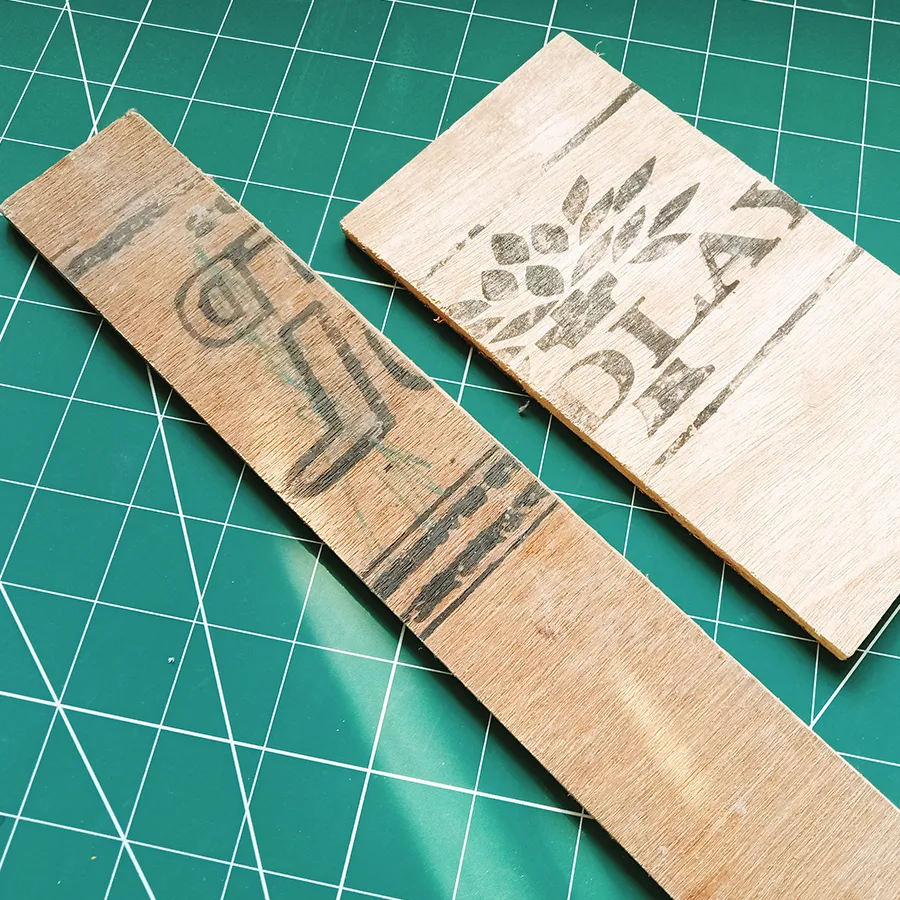
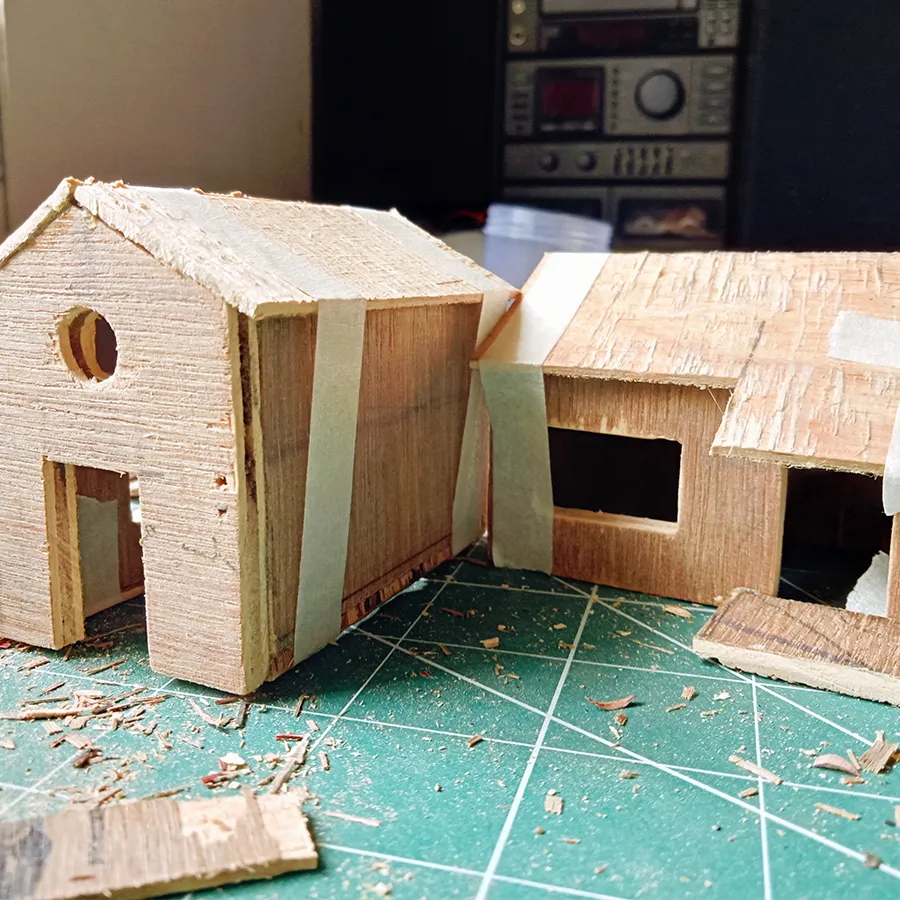
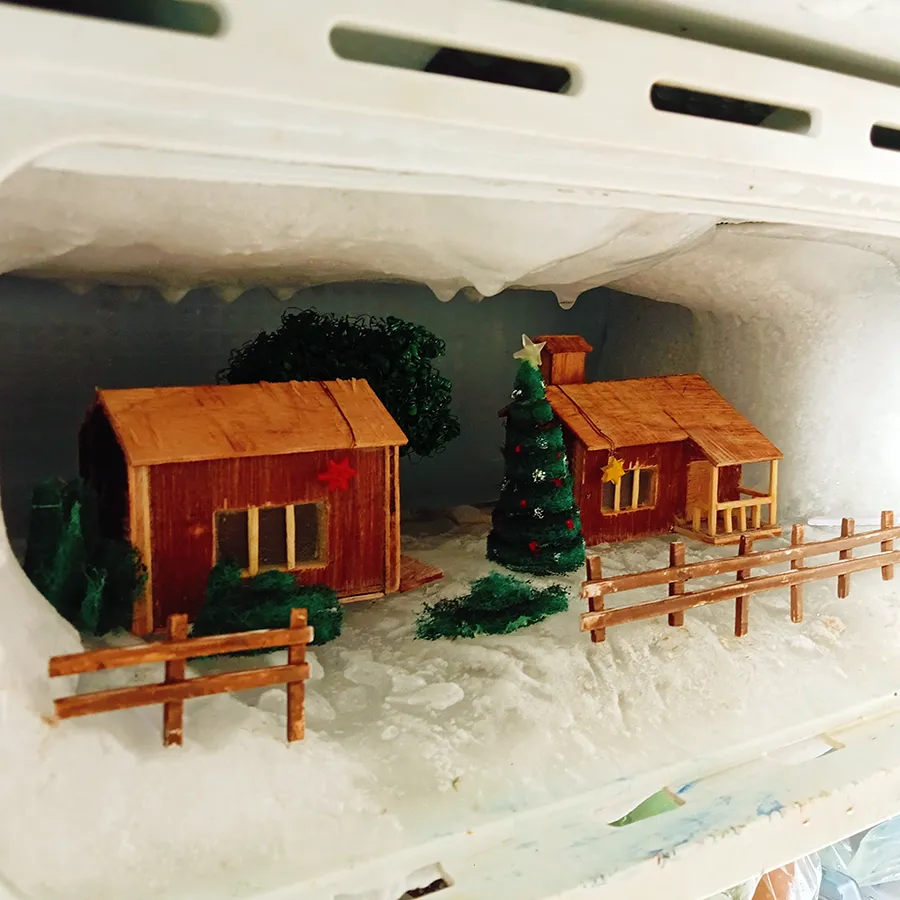
Since the height of my freezer is 32×12 cm, I designed the house to be 10 cm tall to fit within the space. To create a realistic miniature log house, I chose 5mm thick plywood for the walls. My goal was to capture the charm of a snowy Christmas night, complete with the cozy glow of a house in a winter landscape. It was both challenging and experimental, as it was my first attempt at this kind of project.
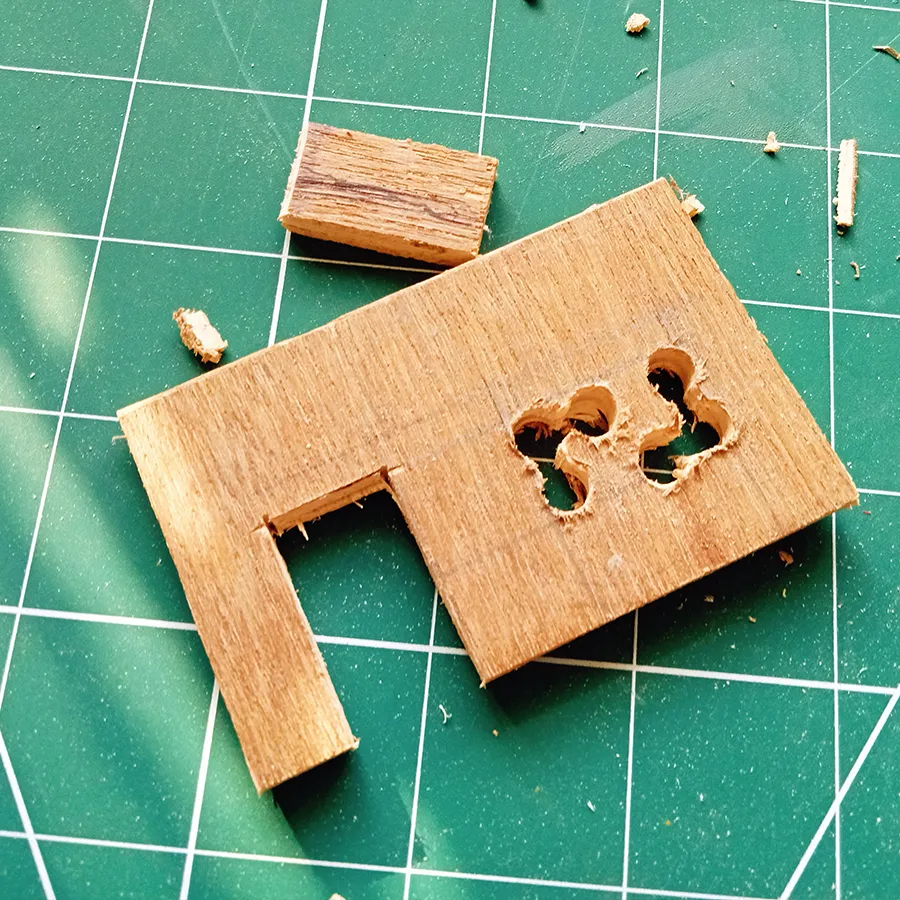
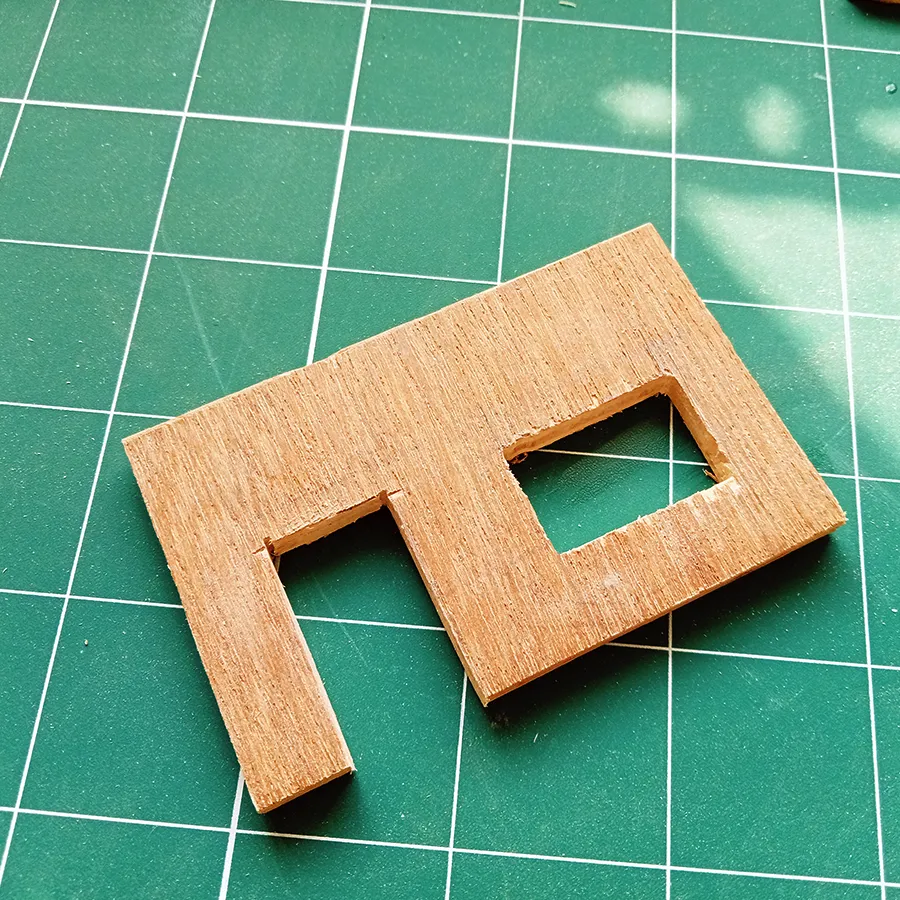
I created the door by cutting the plywood with a hacksaw and a cutter. For the windows, I initially drilled holes, then inserted a blade, and carefully cut them into the desired window shapes. Finally, I smoothed the edges using a wood-filing tool for a clean finish.
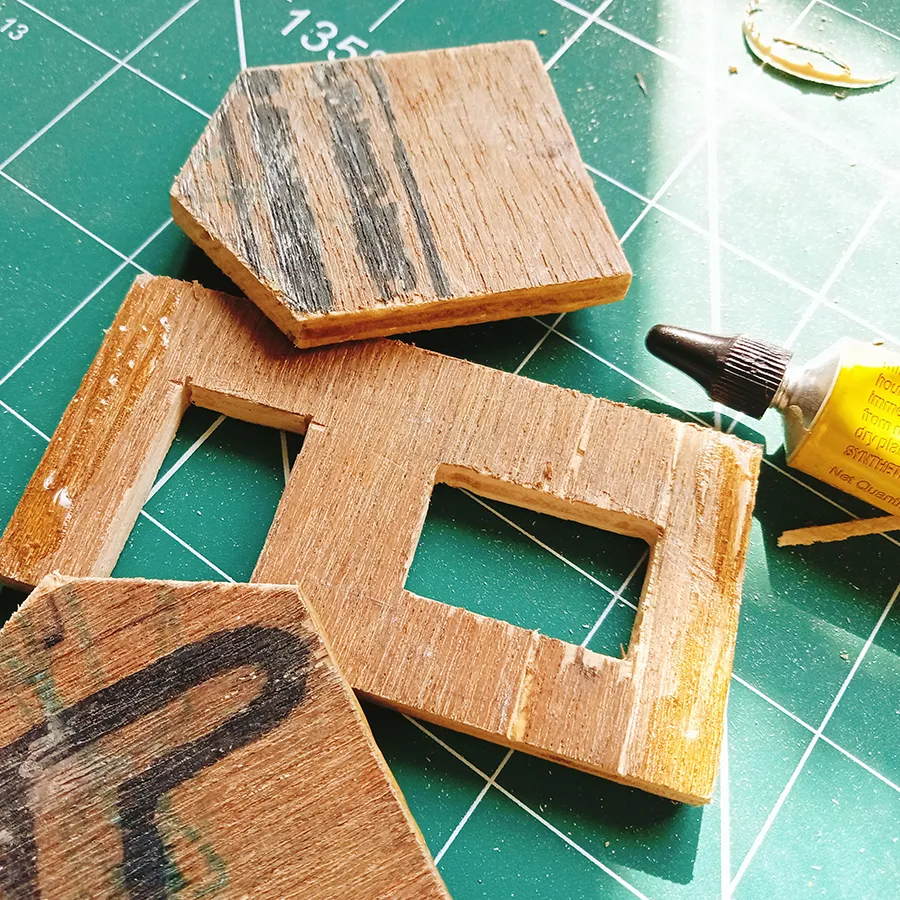
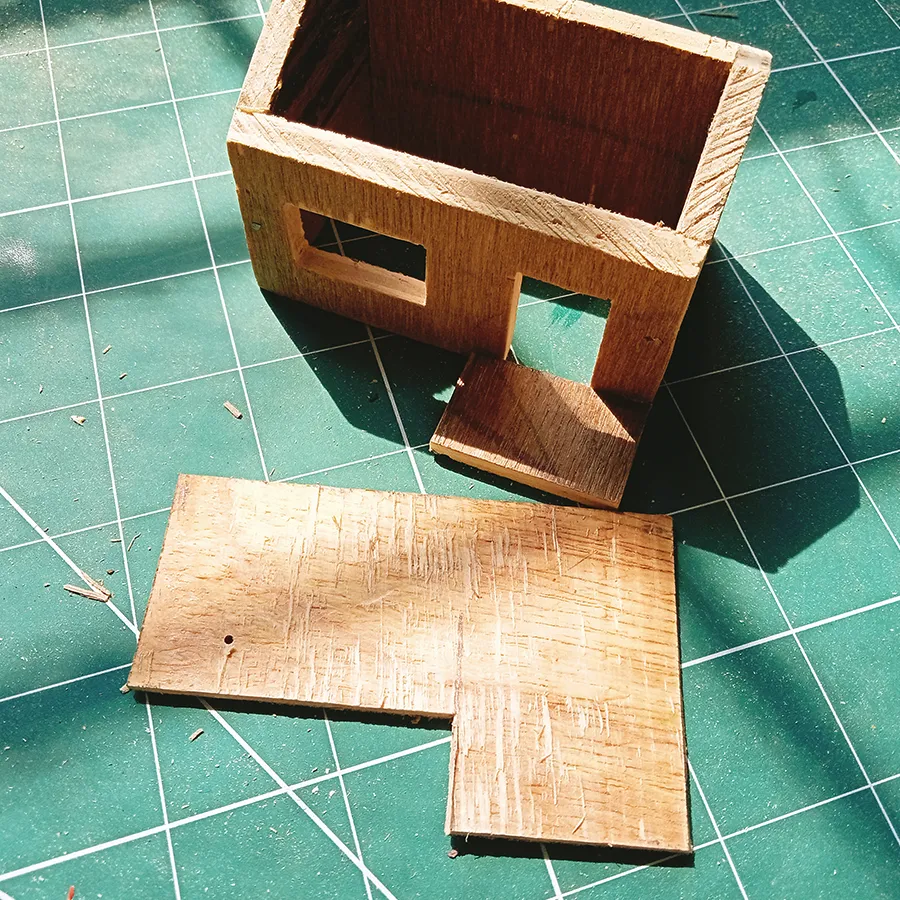
I fixed the walls using synthetic glue and secured each intersection with a single nail for added stability. For the roof, I used a face veneer, the top layer of the board, to achieve a realistic finish with textures.
Creating veranda railing and installing window glass
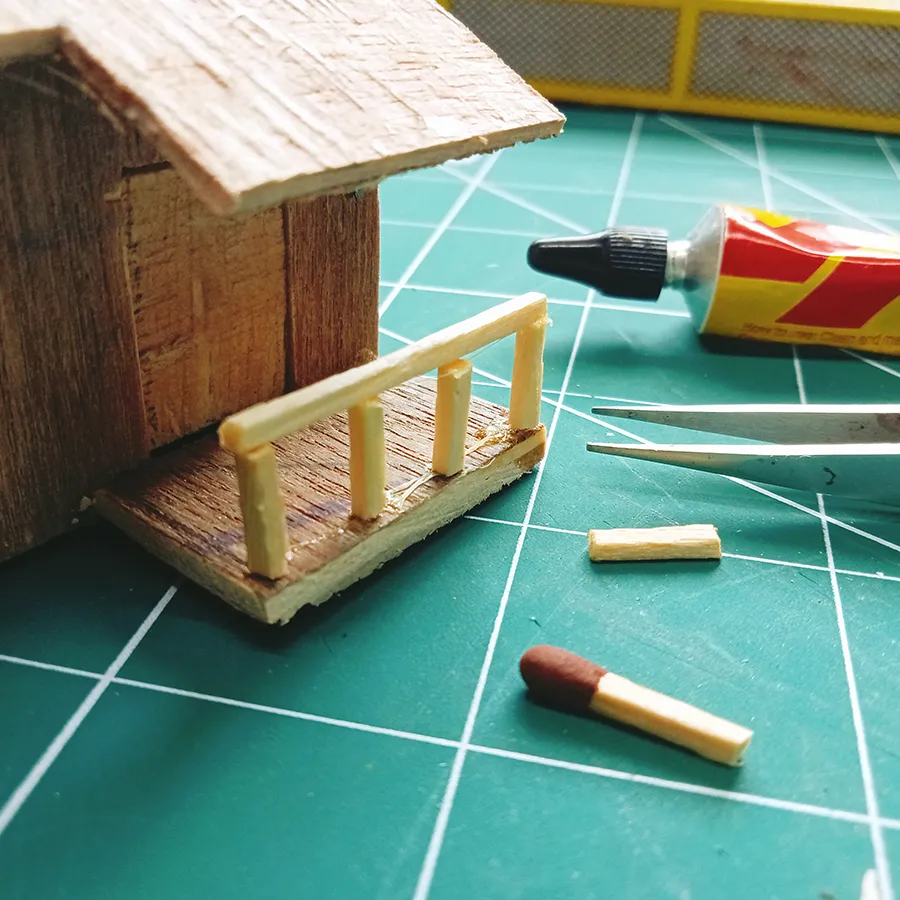
I chose matchsticks to create the veranda railing and pillars. The combination of the plywood texture and matchsticks looks incredibly realistic. Since super glue didn’t work well with matchsticks, I used synthetic glue instead, which made the arrangement a bit challenging until it solidified.
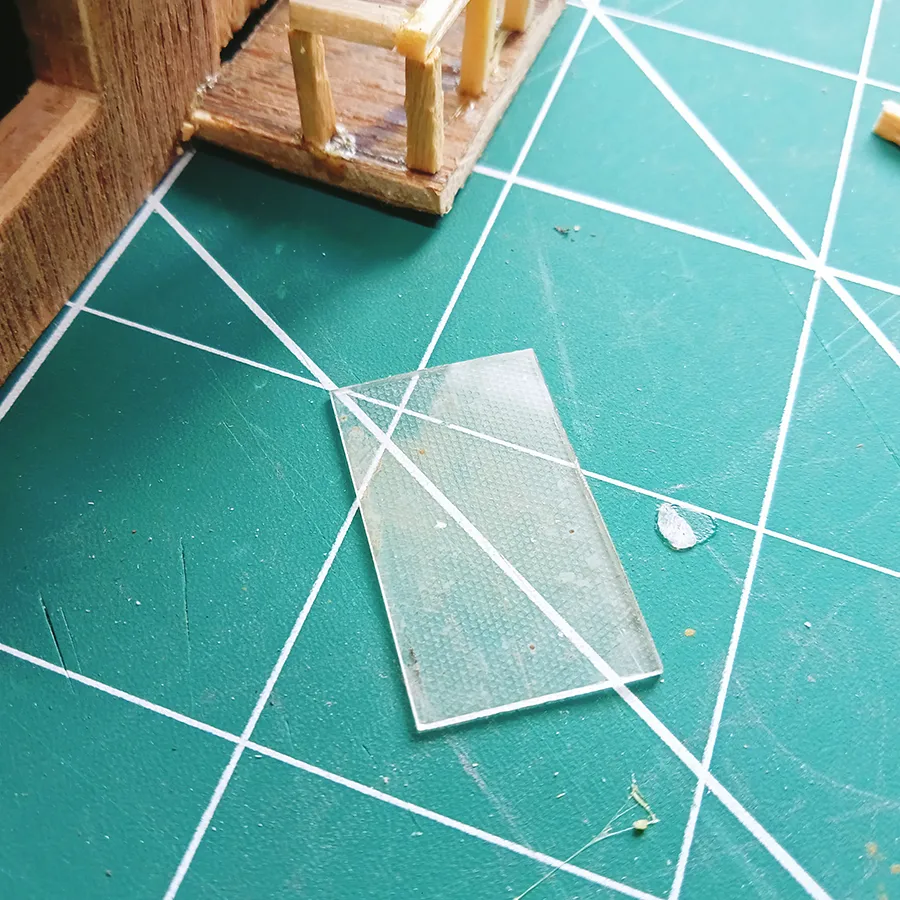
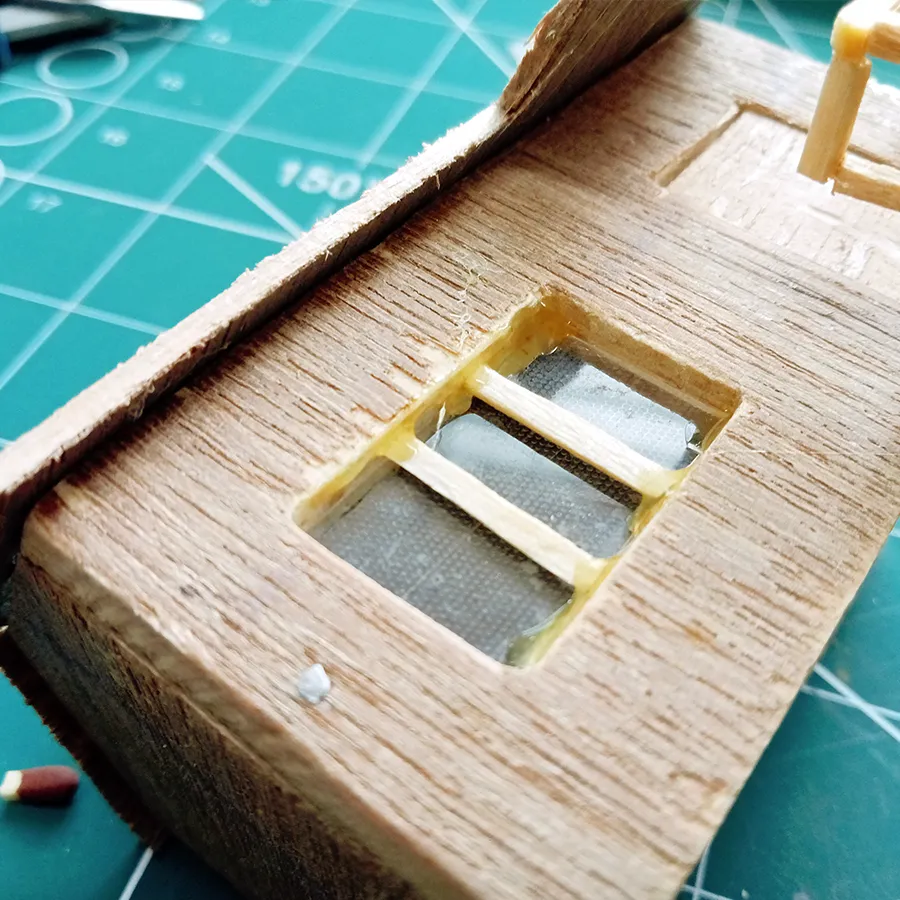
I cut a 1mm thick semi-ground glass and shaped it to fit the window size. To make it look more realistic, I added extra glue around the inside corners of the window.
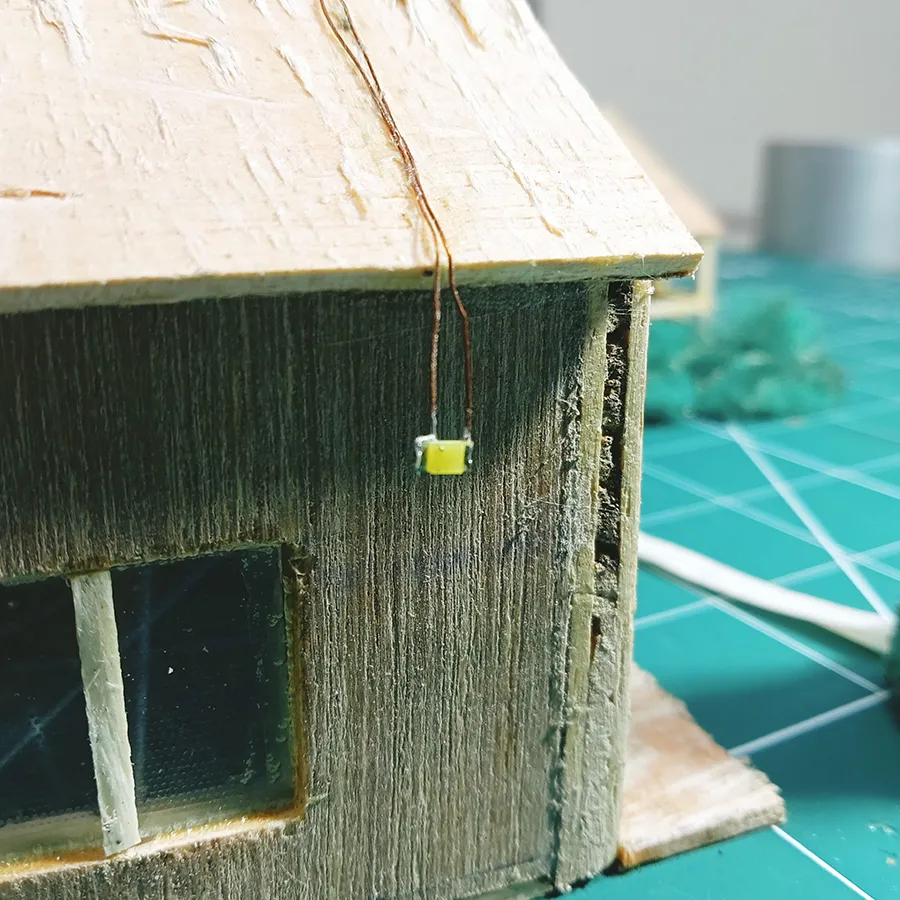
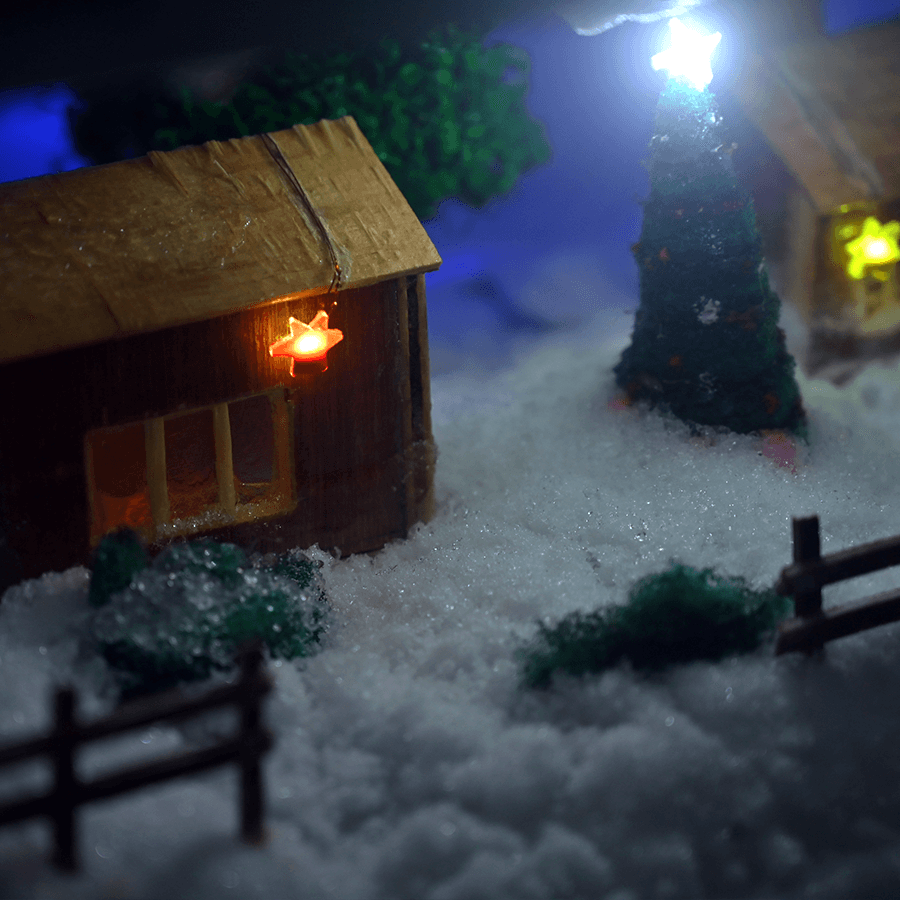
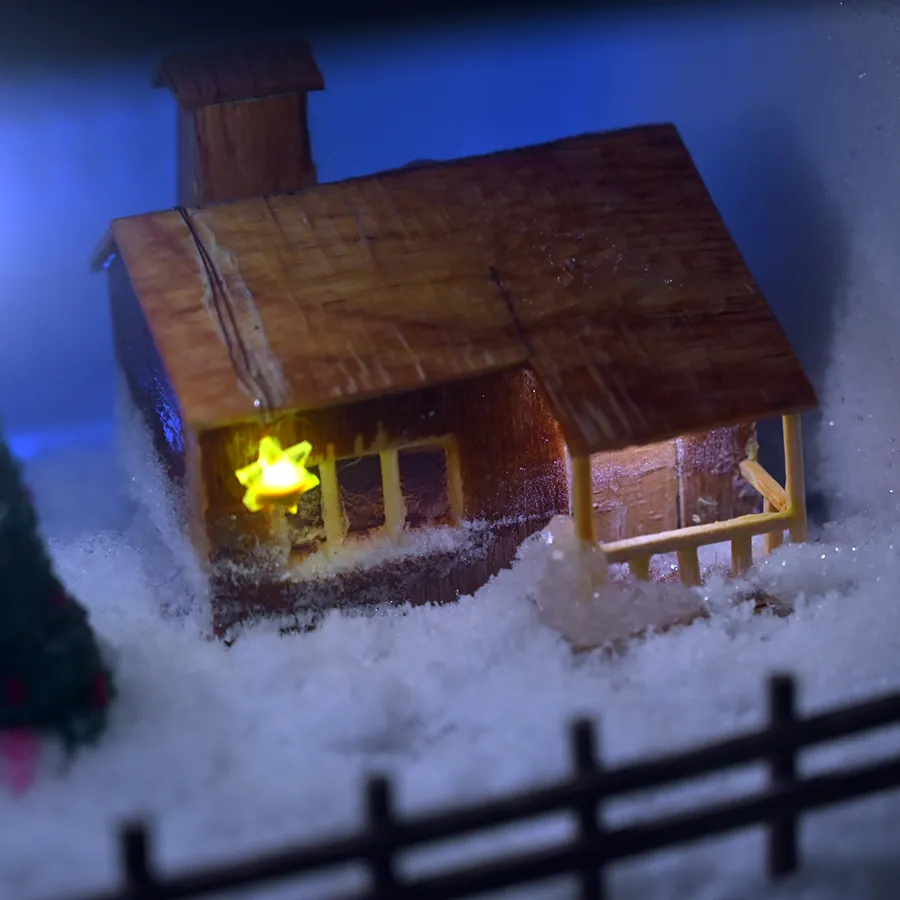
Installing LED lights in the miniature house for freezer Christmas village scene
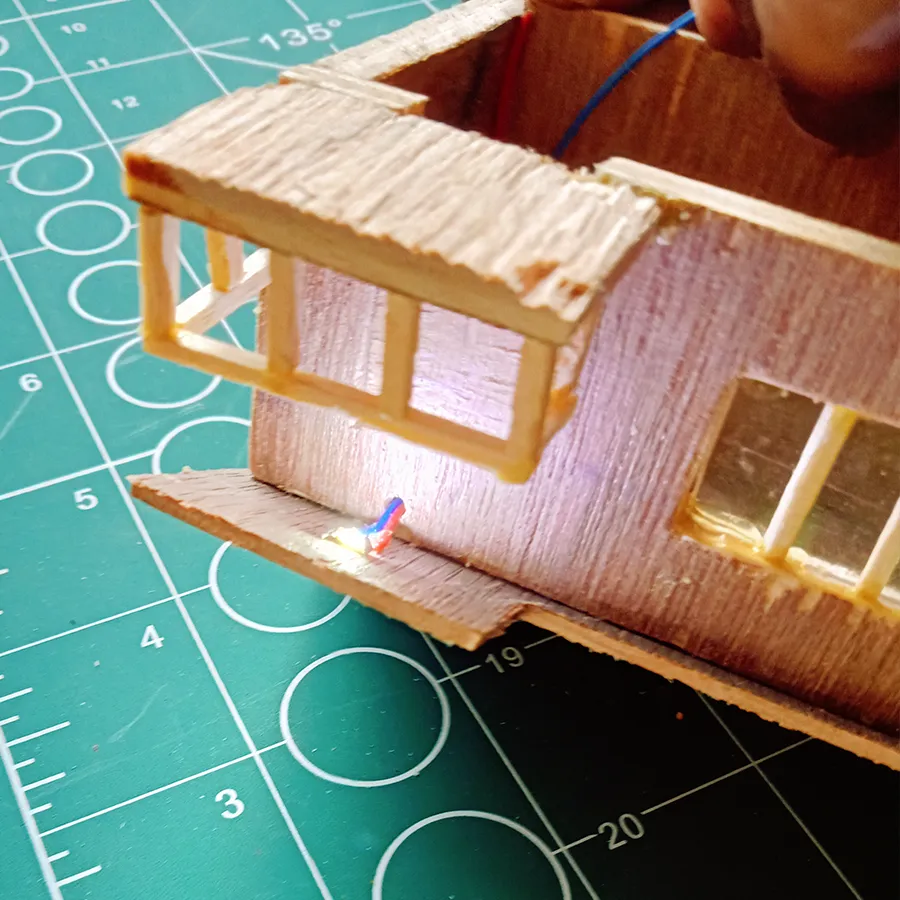
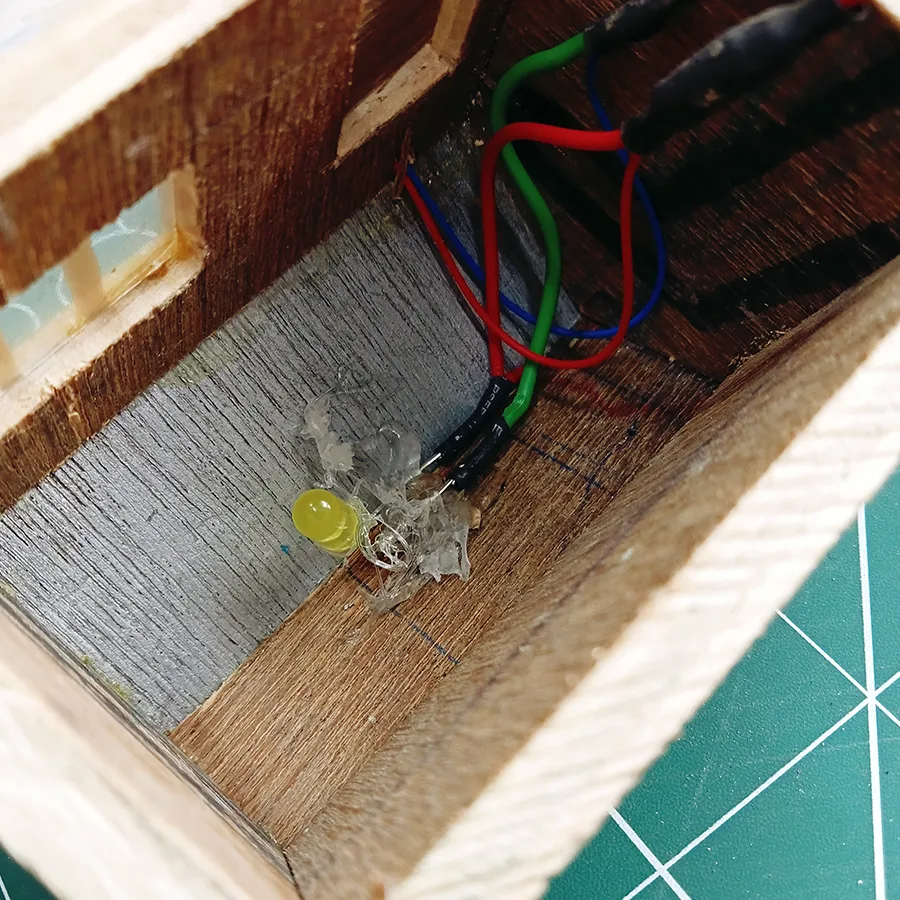
I installed an LED light under the roof for veranda using a 1206 SMD LED with a 330-ohm resistor in series to reduce the brightness. I also fitted a 3mm yellow LED bulb inside the house. The idea for this project came about unexpectedly, just three days before Christmas. I wasn’t sure whether snow would form on the miniature models I had created after installing them inside the freezer; it was just an experiment. And I didn’t purchase anything specifically for this project. Everything I used was from my collection, and a few household items.
Crafting the Christmas tree and garden
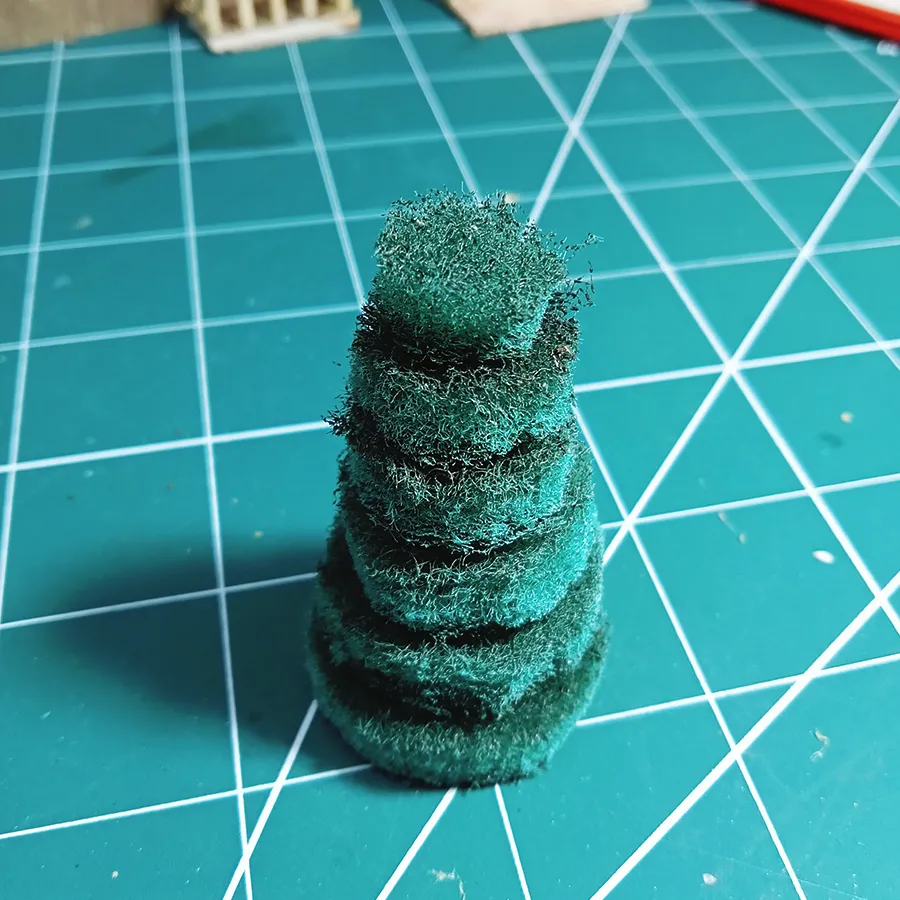
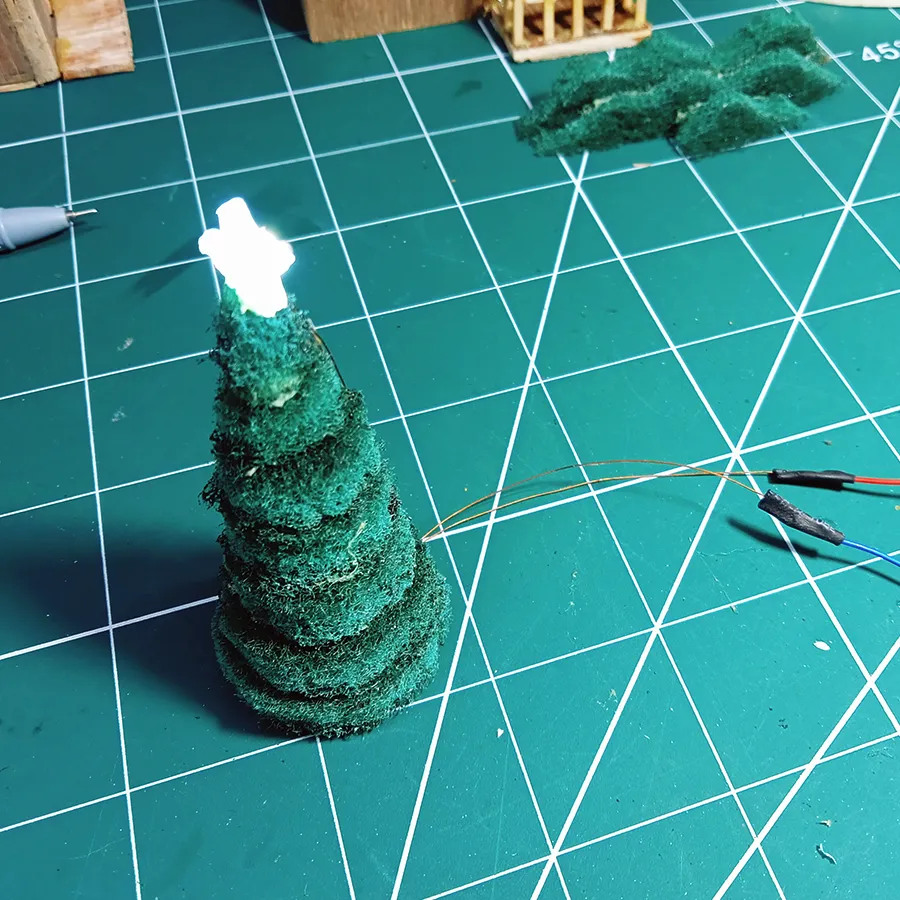
The Christmas tree was made from a dishwashing scrub sponge, which provided the perfect shape and texture to resemble a realistic tree. I created six circular shapes, then stacked and glued them together to form a cone. Once assembled, I added an SMD LED with a star at the top. For the wiring, I used insulated wire repurposed from a speaker coil.
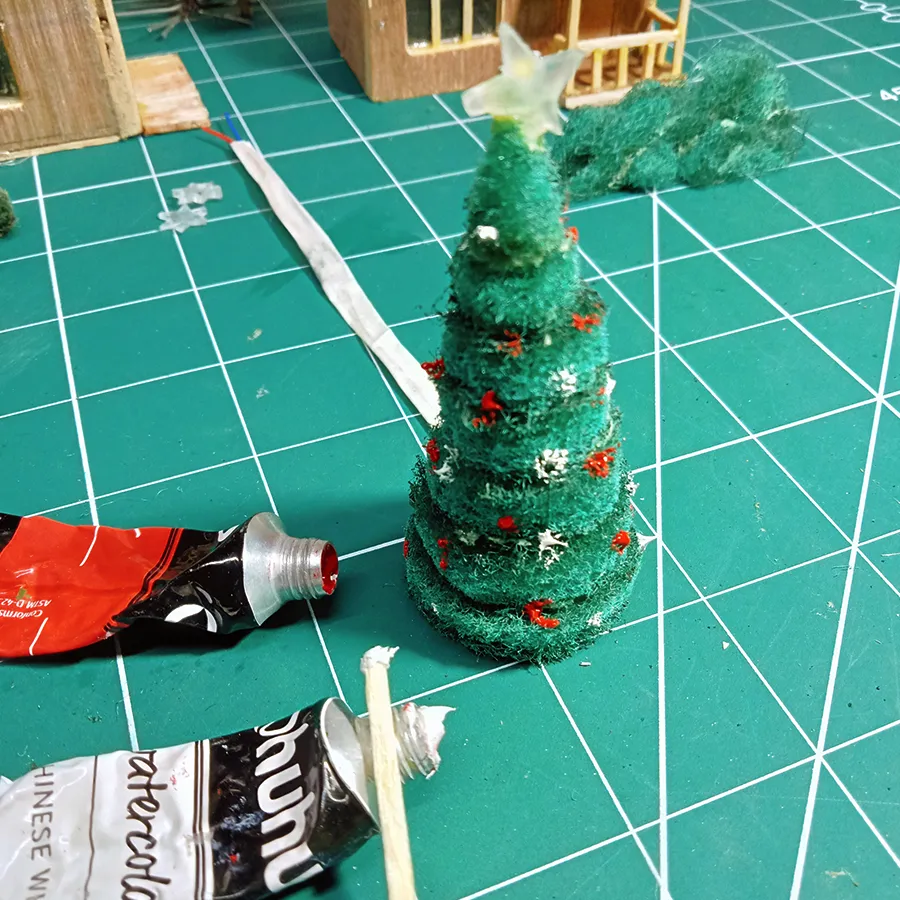
Finally, I applied dots of white and red acrylic paint on the surface of the tree using a matchstick to resemble ornaments. I wasn’t sure how it would turn out once the snow was created on it.
Icy Christmas miniature scene in a freezer—crafting a miniature tree
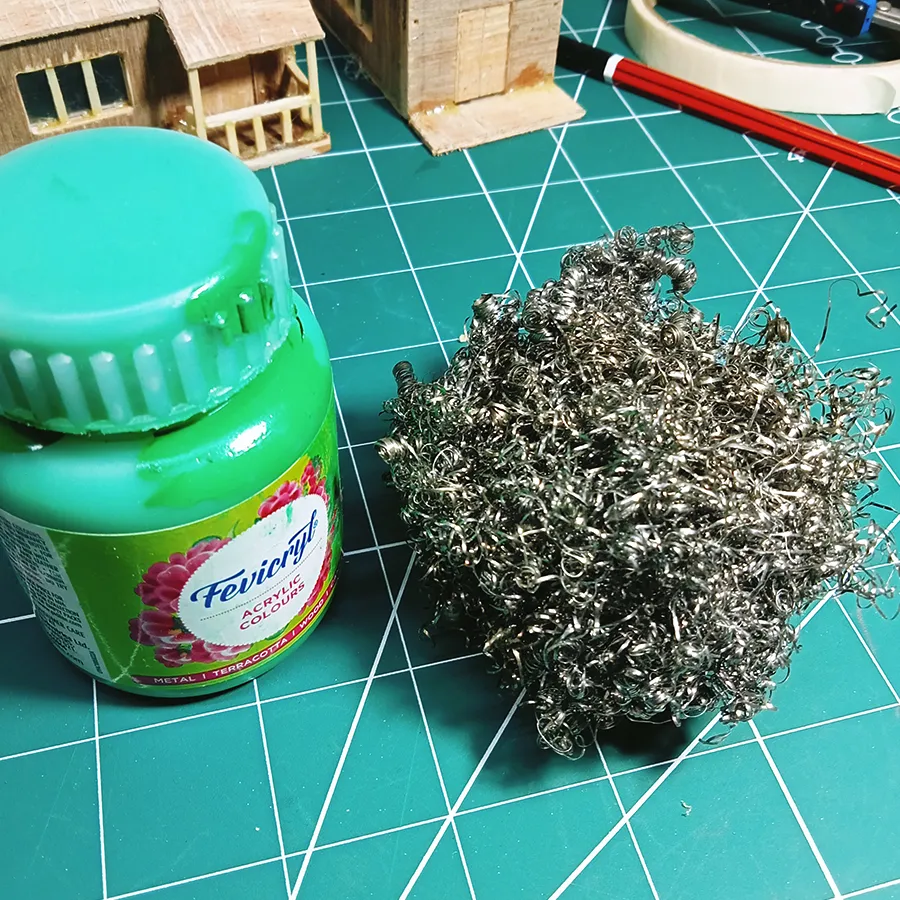
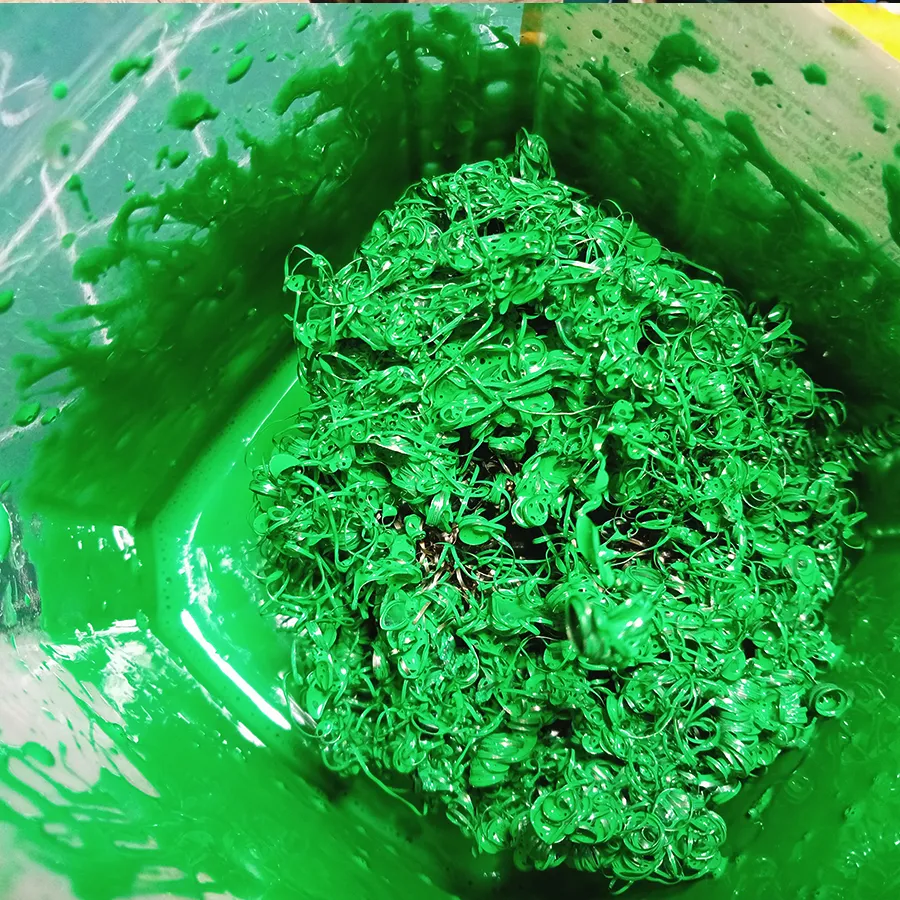
For this “Christmas-themed snowy miniature village in a freezer,” I wanted to add a tree behind the houses that could also hold the weight of the snow. To create it, I repurposed a dishwashing steel scrub, dipped it in green acrylic paint, and shook it well to ensure the paint covered the entire surface, forming a sturdy and festive base.
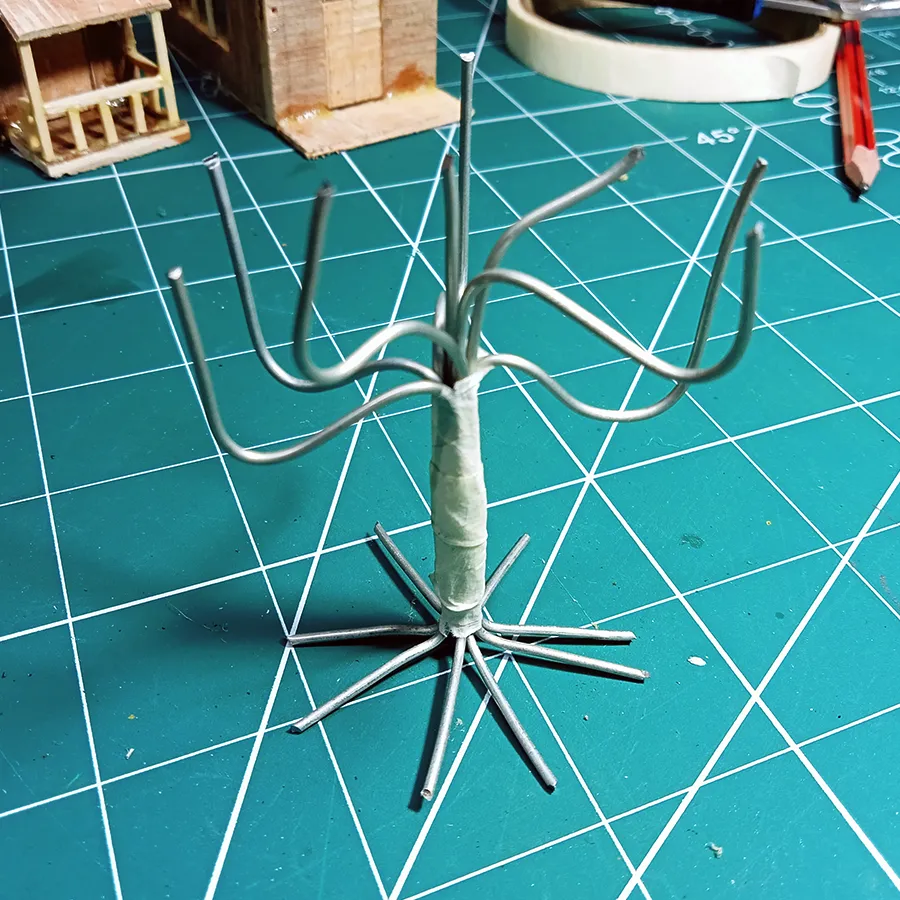
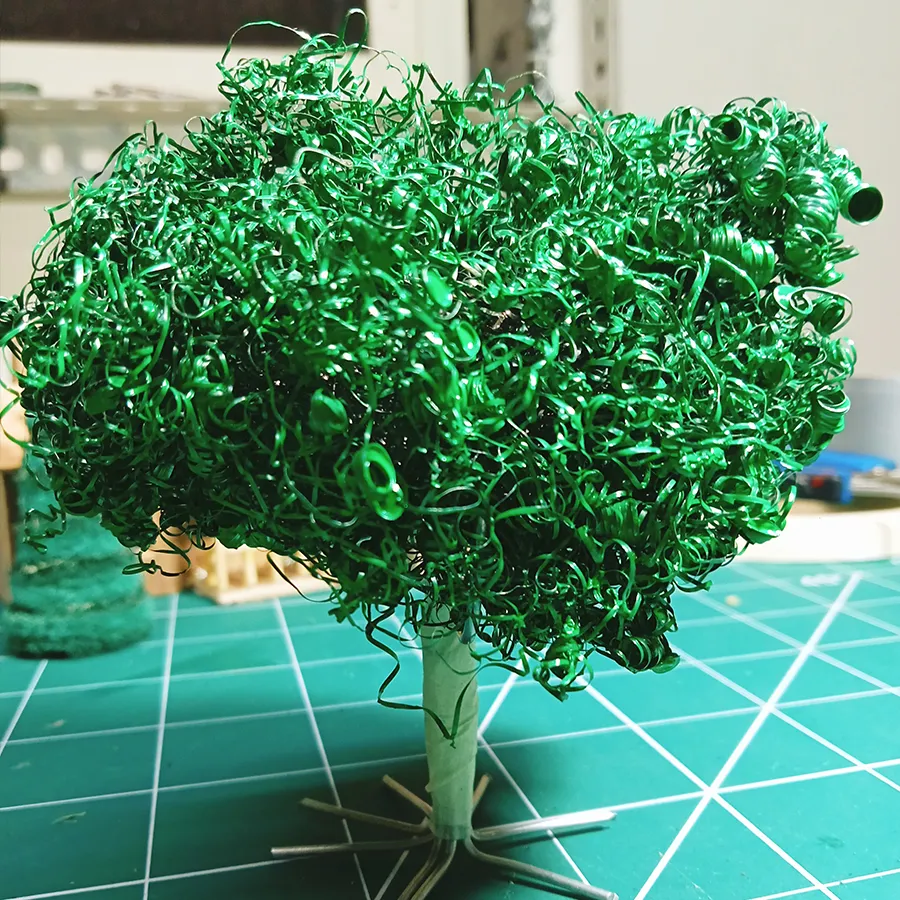
For the trunk and branches, I used binding wire, cutting several pieces and tying them together with masking tape to form the tree trunk and branches. Although it didn’t resemble a real tree, I hoped it would look better once the snow covered it. To create a detailed garden, follow these steps.
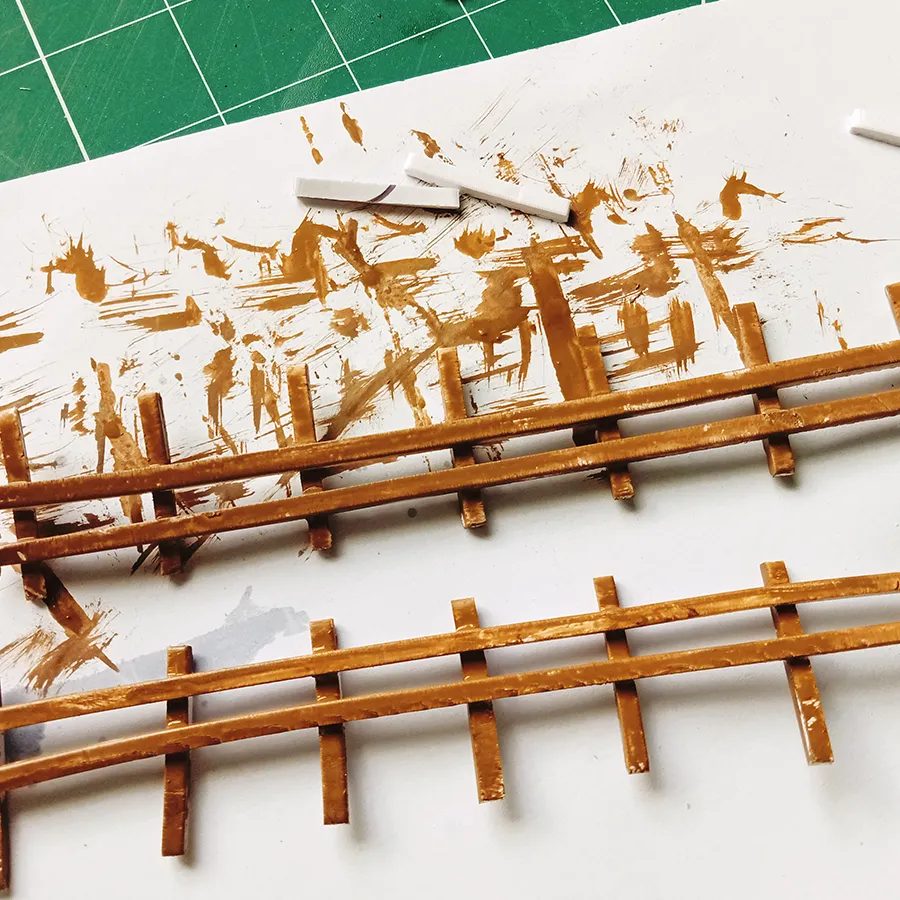
Crafting a miniature fence for Snowy Miniature Christmas Scene
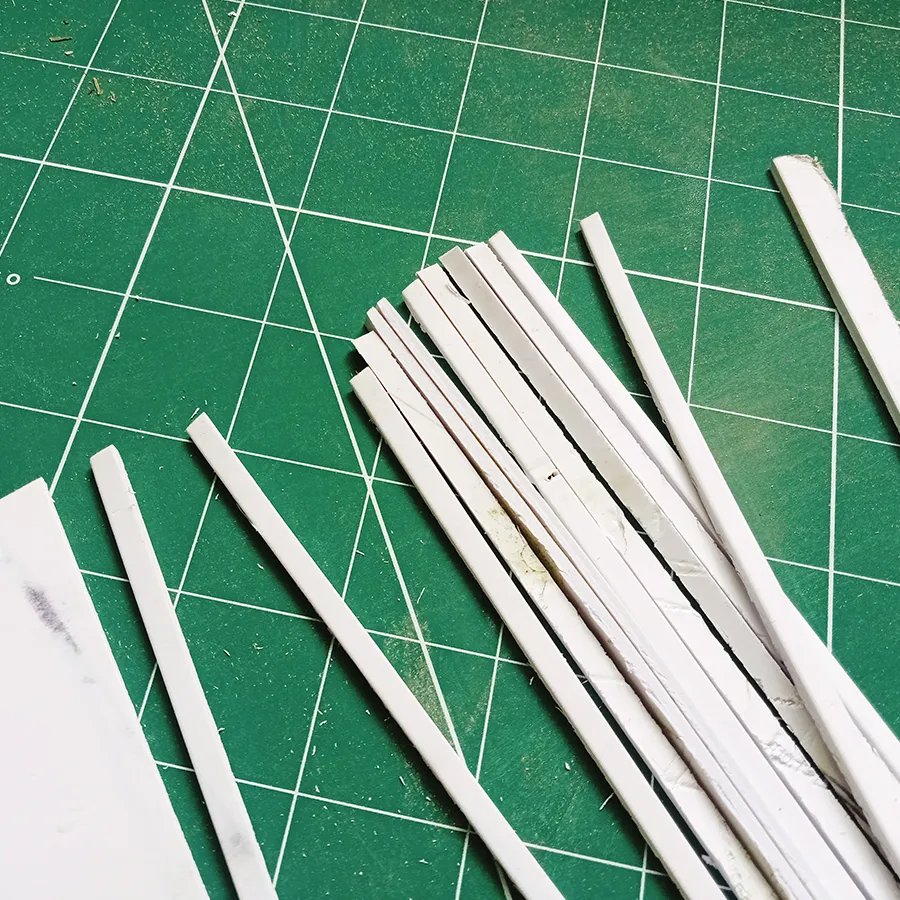
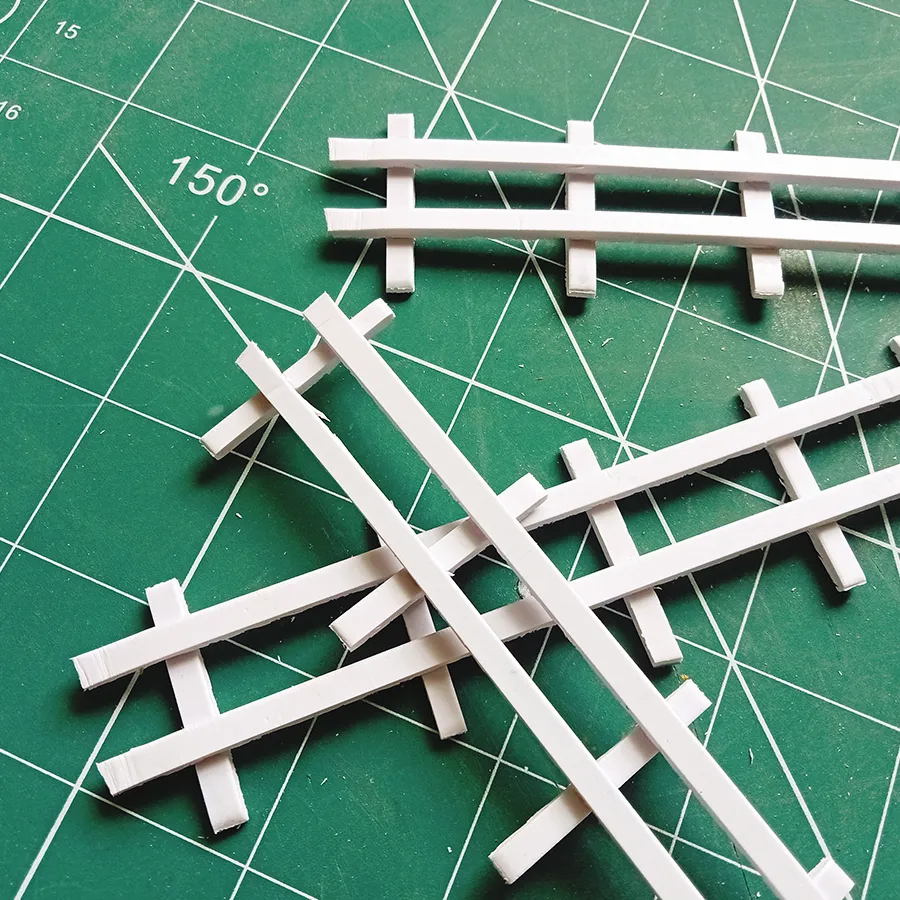
For the fence, I used a 3mm foam sheet and cut it into 3mm width strips. Using super glue, I stuck the strips together to create a fence. Later, I painted it with a mix of brown, black, and white acrylic to achieve a realistic wood texture. Be careful when using super glue. It’s better not to use it with bare hands; using a tweezer or nose pliers would be a safer choice.
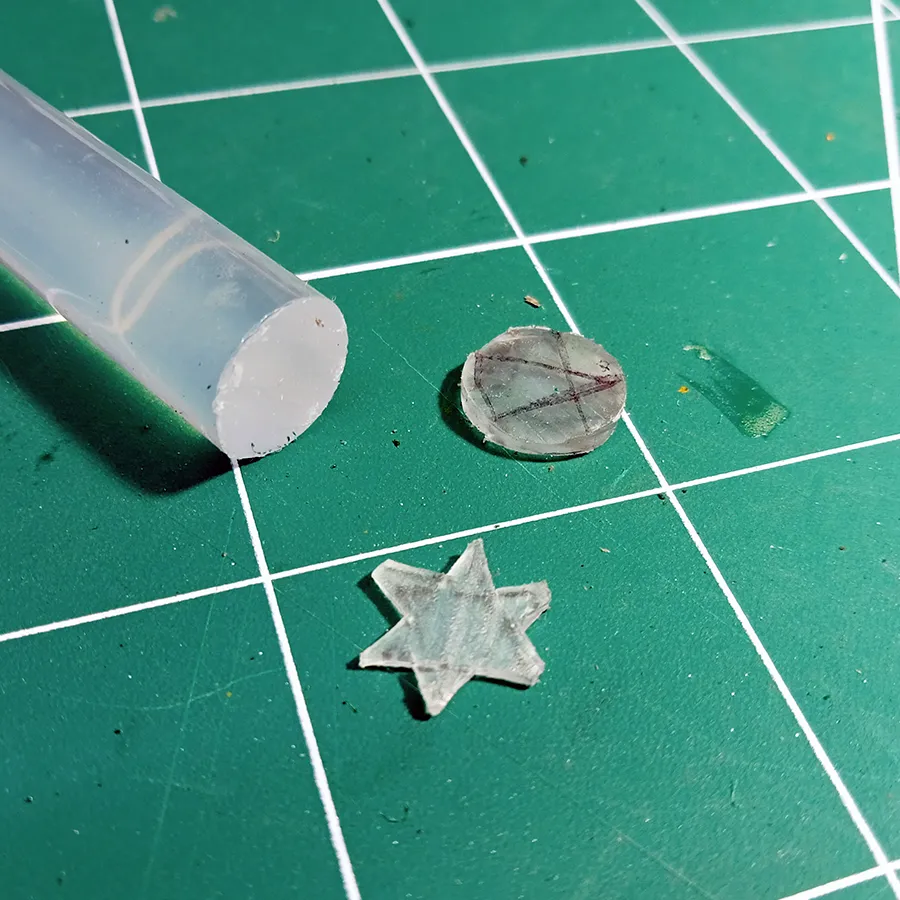
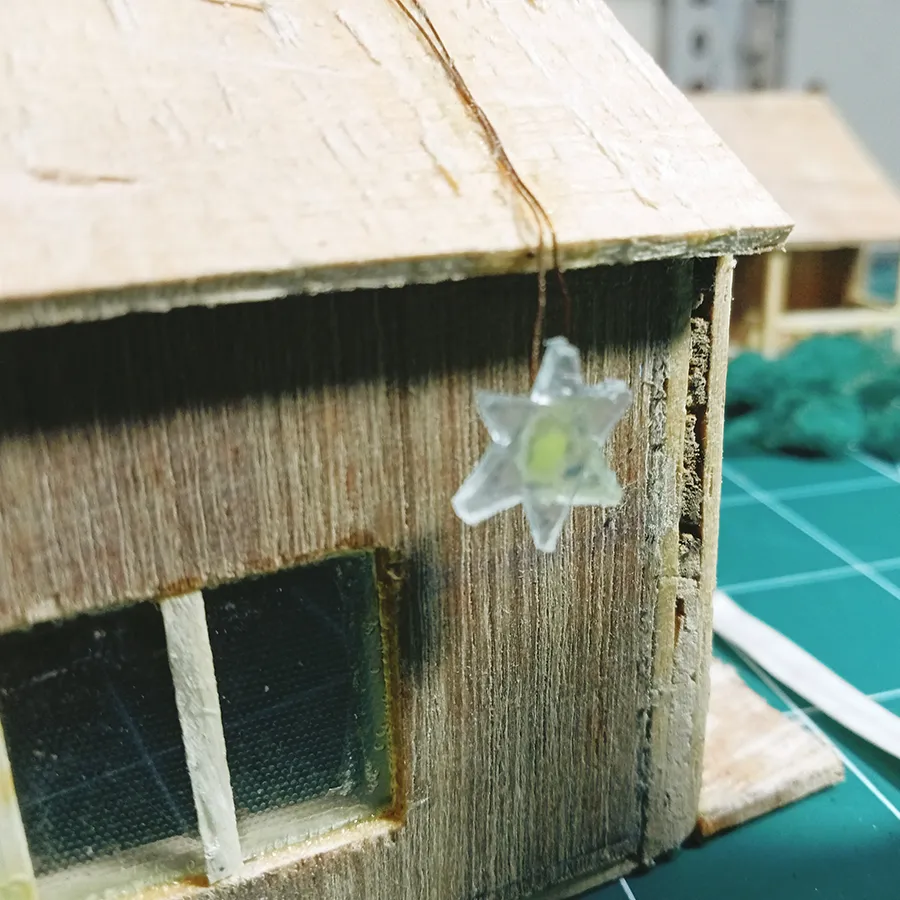
Crafting miniature Christmas star
At the final stage of a Christmas-themed snowy miniature village in a freezer, I hung a star inside the miniature house using an SMD 1206 LED soldered to an insulated wire. To reduce the brightness, I added a 330-ohm resistor in series with the LED. For the star, I used a hot glue stick, sliced it into 2mm thick pieces, cut it into a star shape, and then painted it. This creative touch added a magical glow to the scene, completing the festive miniature project.
Final snowy Christmas miniature installation inside freezer
It was so interesting and curious once I placed all the miniature items inside the freezer. It looked incredibly realistic and gave a mesmerizing feel. I completed the project in one day, starting at 9 AM and finishing by 11 PM. Before placing the models, I turned off the freezer an hour earlier so the ice would melt, and later created a flat surface using a knife to place the houses and trees. (Note: Be careful when using sharp tools to scrape the freezer box, as damaging it could lead to gas leakage and cause the cooling to stop working. Please make sure to turn off the refrigerator while setting up the installation.
Christmas-themed snowy miniature village in a freezer—final output Final output
I added a blue LED light in the background to create a bluish sky and backdrop. This is the result I achieved after a day. However, some effects didn’t turn out as I expected, such as mist covering the roof. Instead, I scraped ice powder from the top area of the freezer box. Overall, the outcome was interesting, though my freezer might be a bit older and not functioning well enough to form ice on the roof as planned. Let’s tweak once again for better result 😊.
Happy Christmas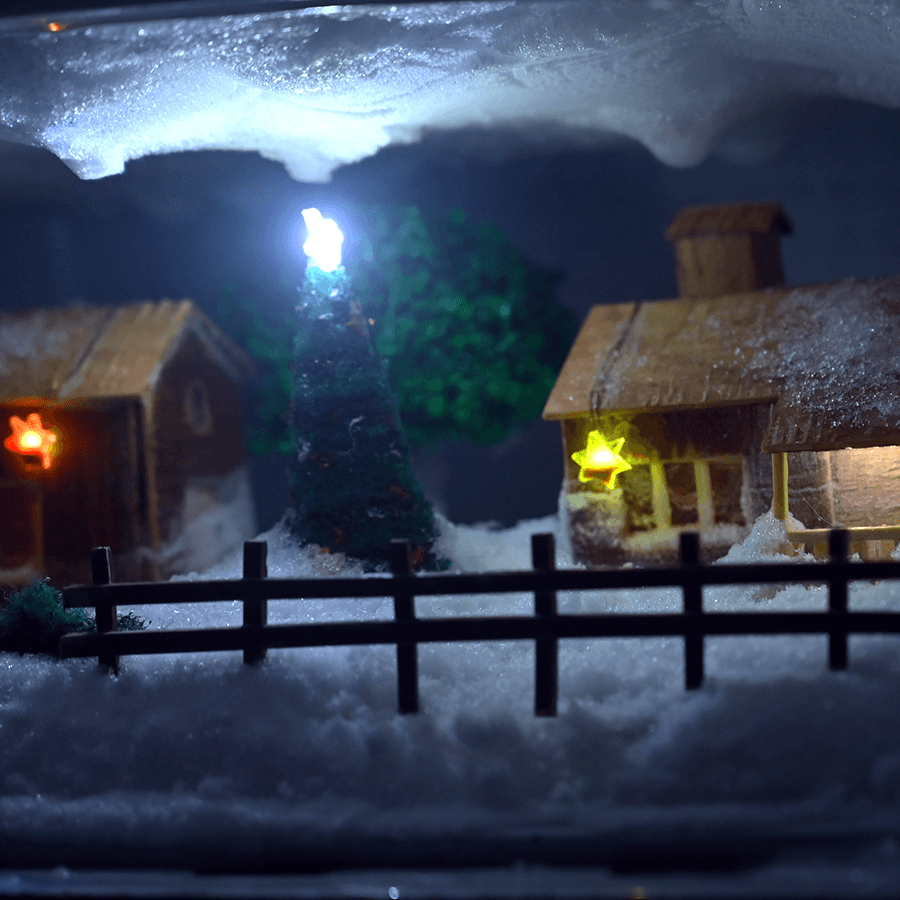
Happy Christmas

DIY concrete flower pot & Bluetooth speaker enclosure
Transforming cement into elegant home décor
Homemade concrete flower planter and Bluetooth speaker enclosure
In the world of DIY crafts, cement transforms into artful, functional pieces. In this DIY cement casting and molding project, I crafted two items: a concrete flower pot and a Bluetooth speaker enclosure. I used foam board molds in two thicknesses (4 mm and 2 mm) for flexibility, allowing for detailed, smooth finishes. From shaping to final touches, I’ll walk you through a step-by-step process for crafting these unique pieces.
1. Crafting a medium-size concrete flower pot

Design and Structure for homemade concrete flower planter
I started with a rough sketch to conceptualize the pot’s form and function. After finalizing the design, I cut foam panels—4 mm for larger surfaces and 2 mm for detailed shapes. However, the 2 mm foam couldn’t support the wet cement’s weight, causing a slight curve instead of a flat surface. My first attempt with 2 mm foam collapsed while casting.
Creating the truncated pyramid structure

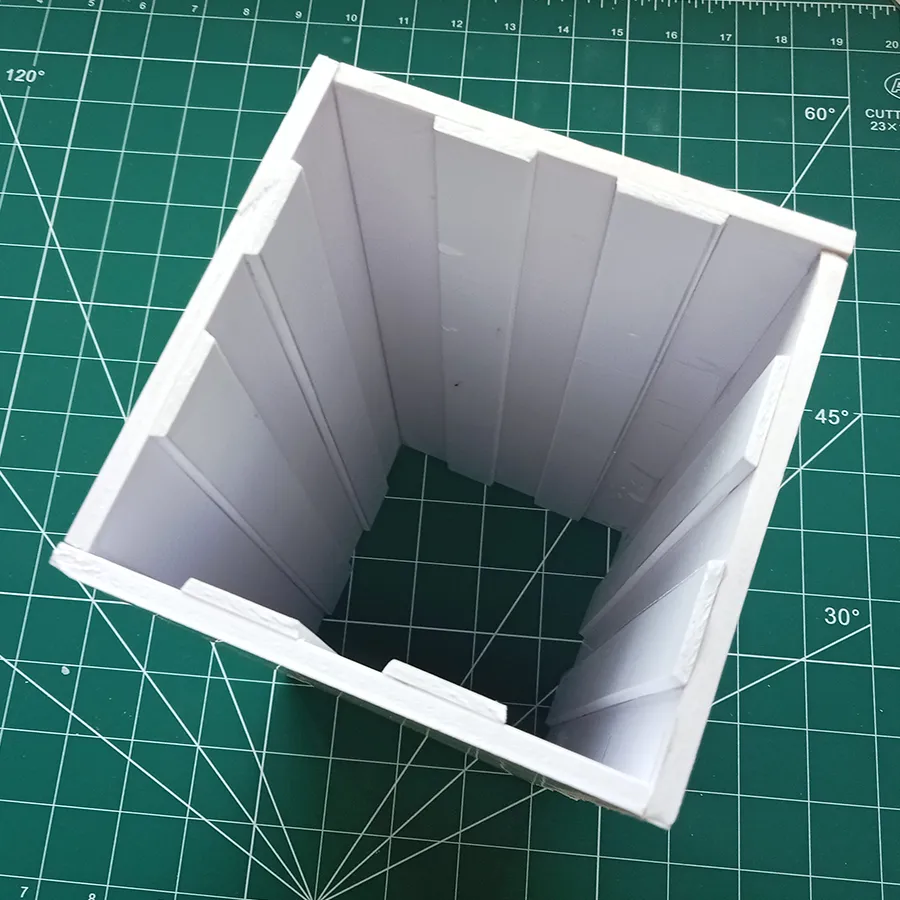
I created four side panels: two trapezoidal cut pieces and two square panels. Each square panel had matching trapezoidal guide lines, angled at 10 degrees, to construct a truncated pyramid structure.

I secured the custom-cut trapezoidal panels to the square panels, aligning them precisely with the trapezoidal guide line. Careful alignment during attachment ensured the top and bottom edges matched evenly. For the molding process, I positioned the pot mold upside down on the base to cast the cement. This approach resulted in sharp, polished surface finishes and clean edges at the top of the pot after curing.

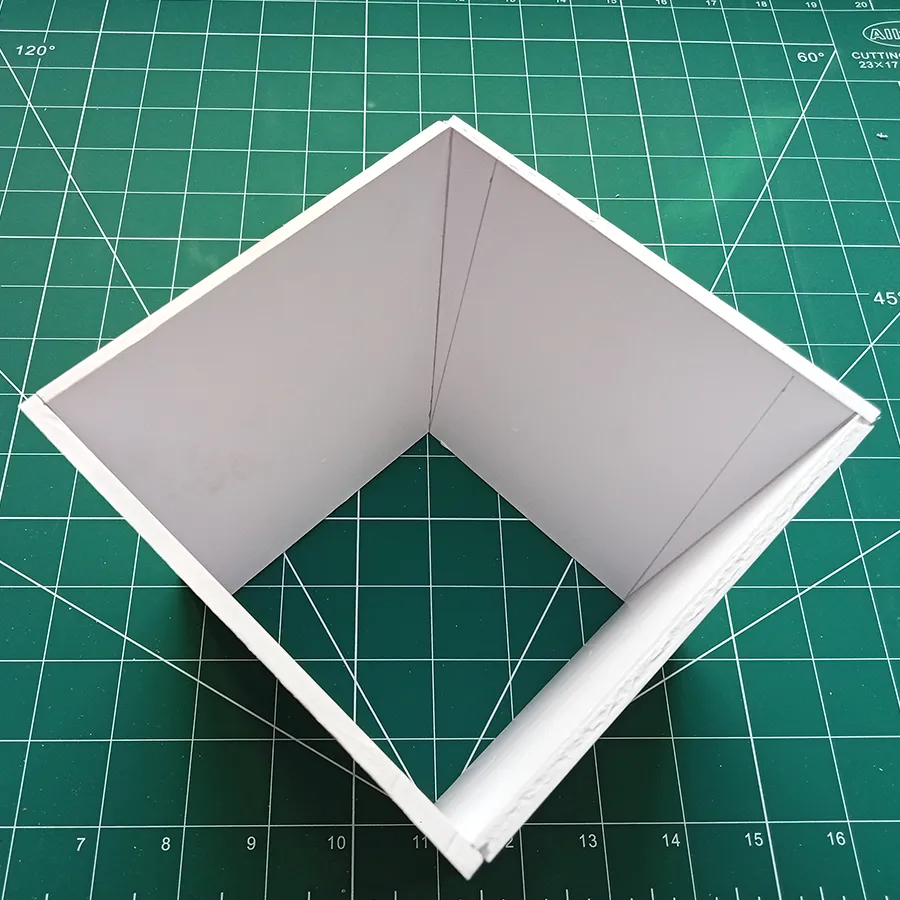
Bottom and top views of the outer truncated pyramid structure.

I created an inner truncated pyramid structure using 2mm foam board, making its width 2 cm shorter and its height 3 cm shorter than the outer truncated pyramid. This design ensures a 2 cm thickness for the pot and a 3 mm thickness for the base.
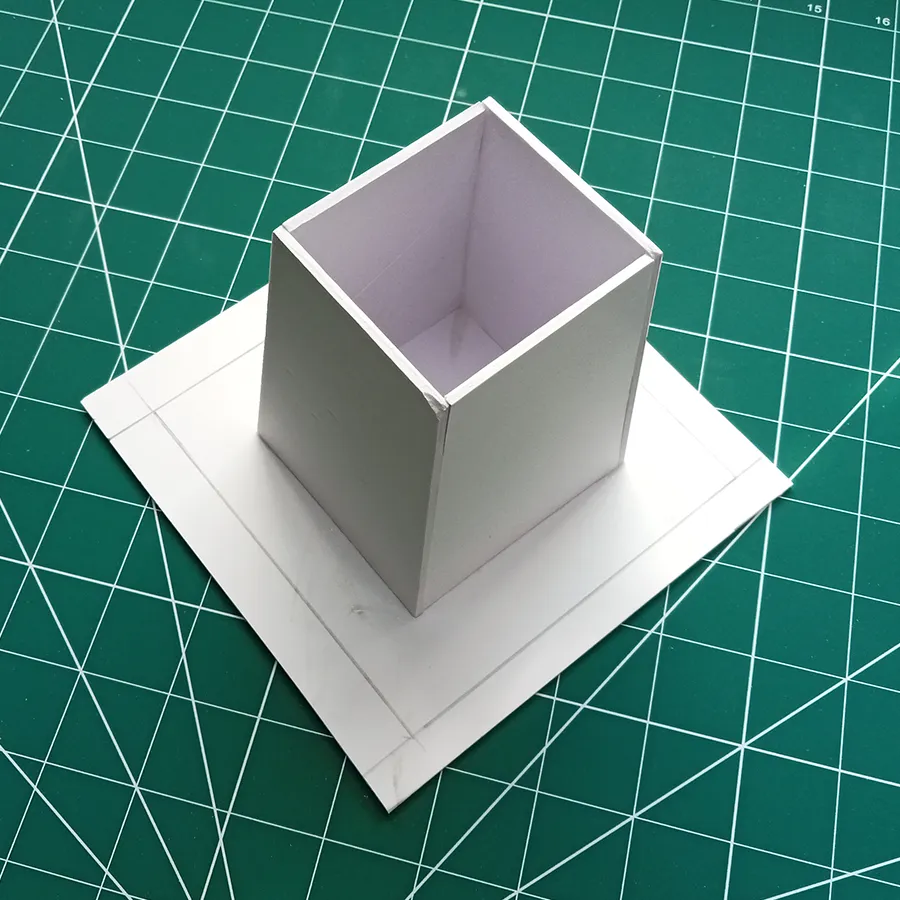
I marked the outlines for both the inner and outer panel positions on the base and attached the inner panels first. It’s important not to attach the foam sheets too firmly, as this would make disassembly difficult after the cement paste cures.
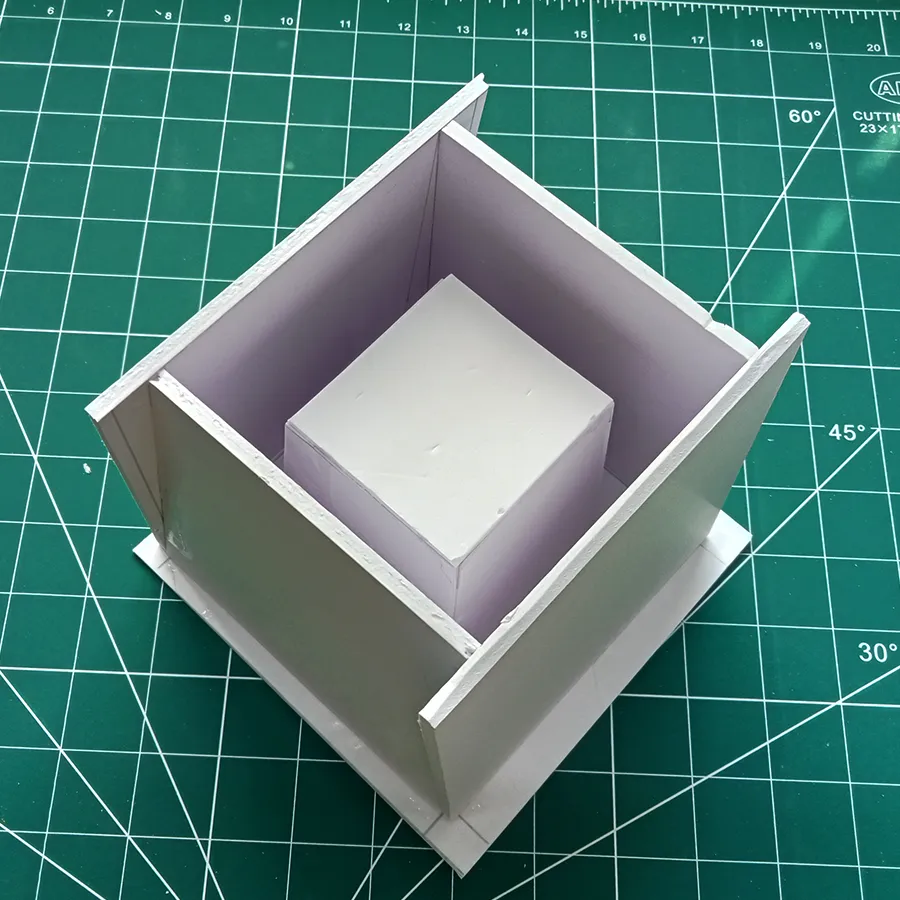
The final step was attaching the outer truncated panels, and it is ready for the casting.
2. Tower-type DIY concrete flower pot

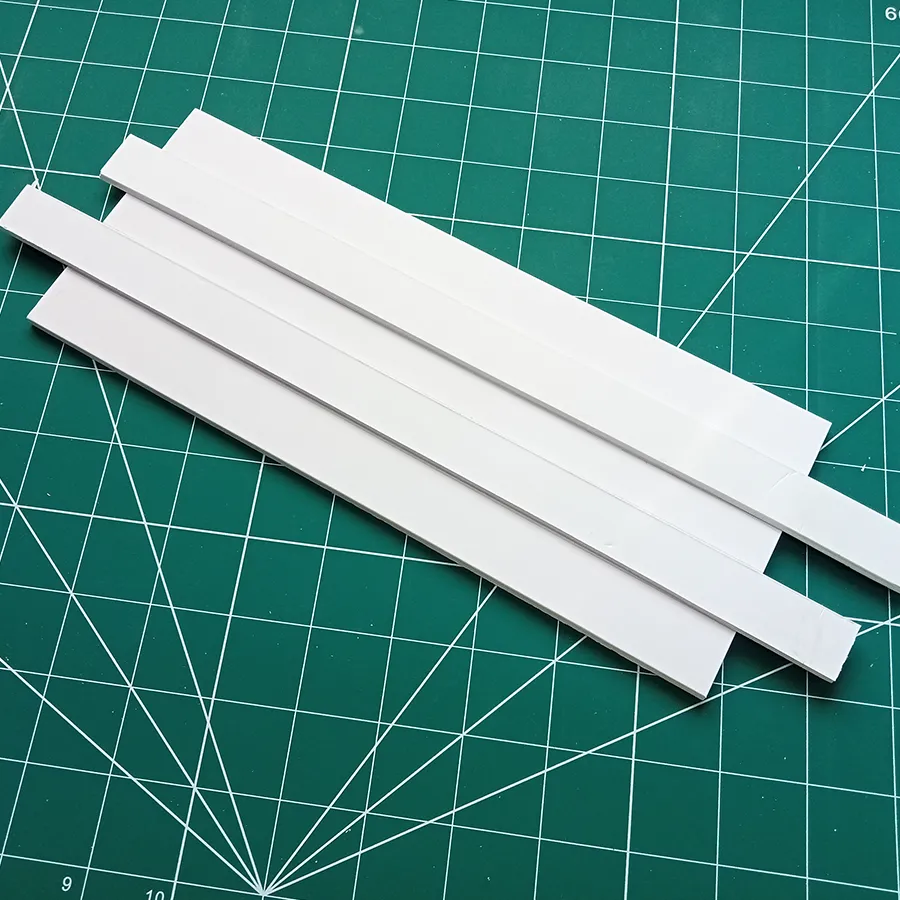
I custom-cut foam pieces to create a tall pot, using 4mm foam for the outer mold panel. To achieve a refined design, I chose 2mm foam for the strip pattern on the outer surface.
Making a strip pattern on the outer surface for the DIY concrete flower pot.

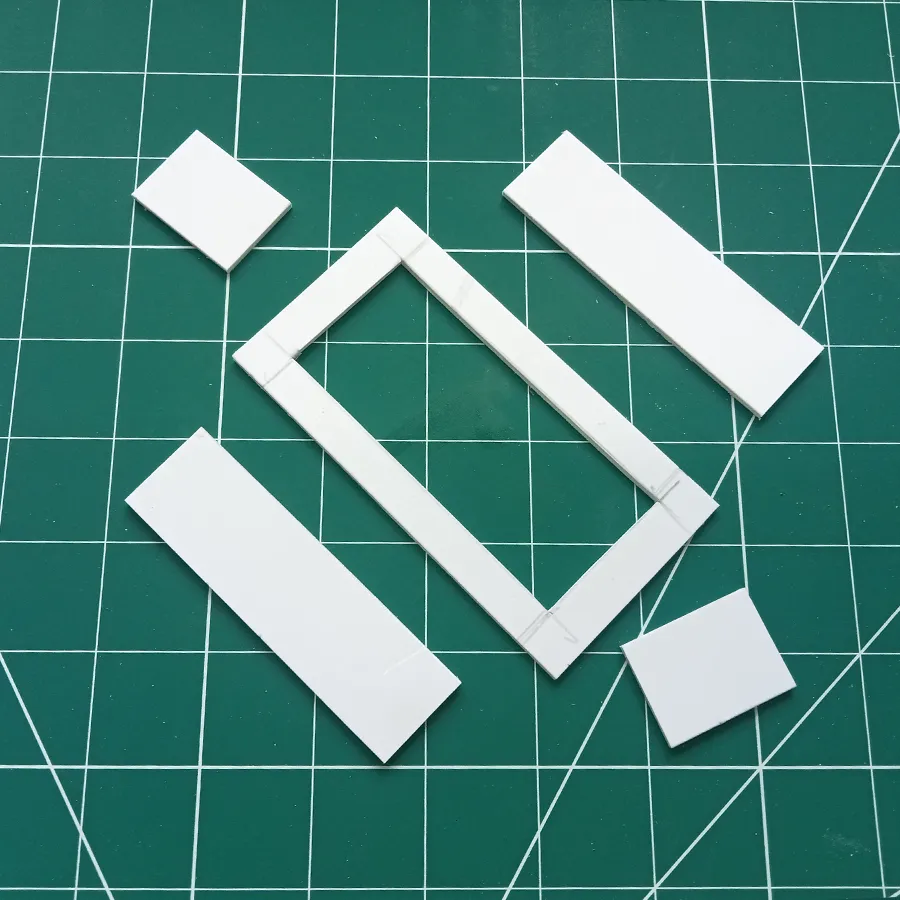
To create a striped pattern on the outer surface, I used 2mm thick foam. I cut the strips with both edges angled diagonally, which made it easier to remove them once the cement solidified.

I attached the four panels together to create a tall rectangular tube, ensuring that the top and bottom edges of each panel were aligned evenly.

Next, I created an inner rectangular tube to form a cavity for casting. Its width is 2 cm, and its height is 4 cm shorter than the outer tube.
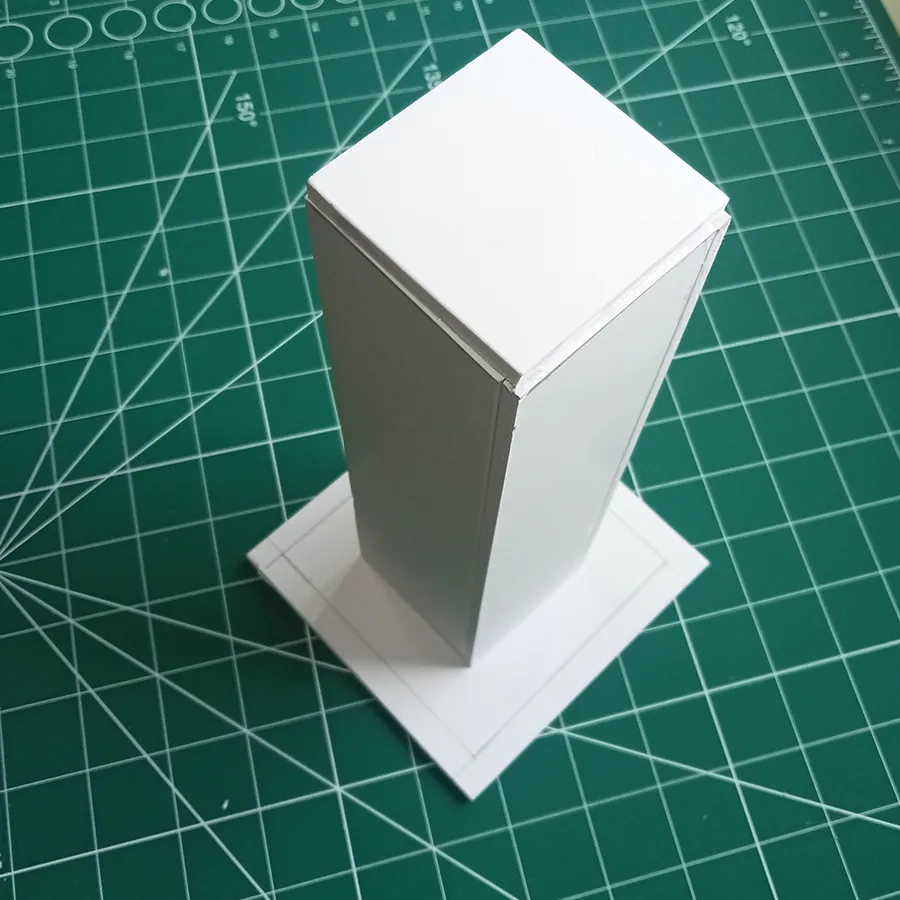

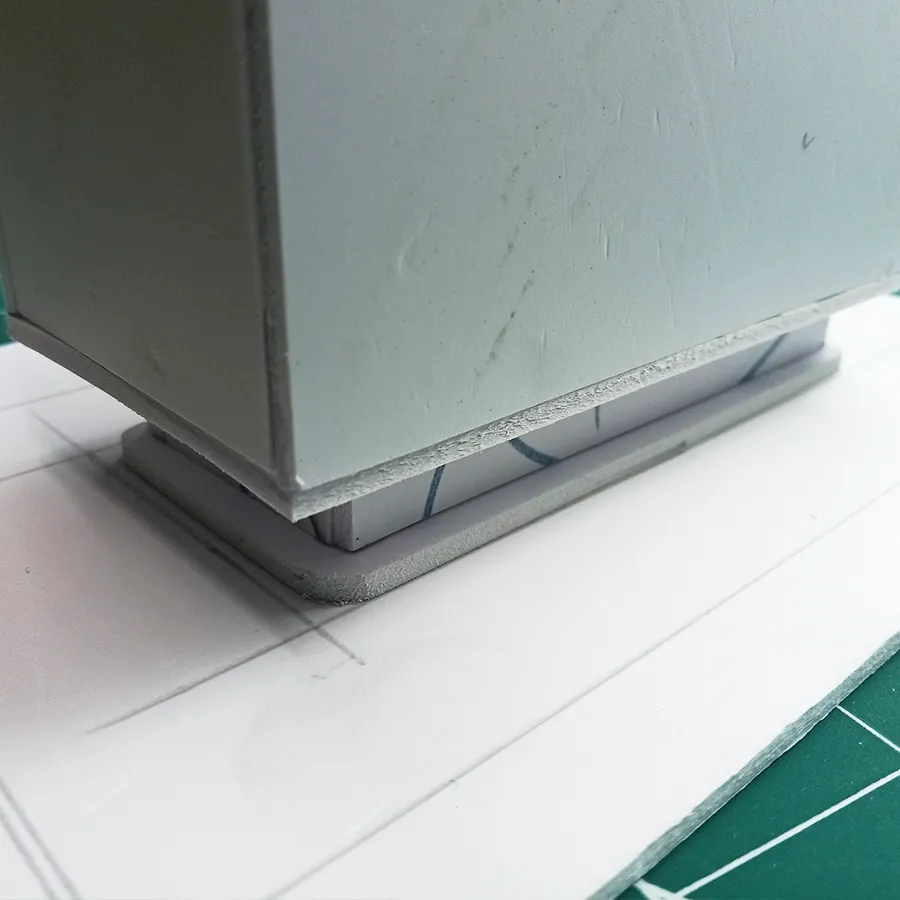
The inner rectangular tube is attached to the base, aligned with the markings; similarly, the outer tube is aligned with the outer markings and attached. It is now ready for the casting process.
3. Bluetooth speaker enclosure
Compared to the flower pot design, the speaker enclosure posed more challenges due to the need for mounting provisions for the speaker, circuit board, and battery. This complexity made the design process more difficult. To address this, I chose to use both 4mm and 2mm foam for construction, which allowed me to create a more precise and sturdy mold. This approach ensures a well-structured enclosure that effectively accommodates all the necessary components.

This base structure includes a provision for mounting the speaker panel onto the enclosure.


This structure is designed to create a hollow section on the front of the enclosure to house the speaker panel. Next, I attached a foam panel vertically to form the inner walls, followed by a horizontal 6mm strip to provide a mounting space for the back cover panel.


I then attached a 2cm high strip vertically over the above structure to create an extrusion.
Then I attached the completed above structure on to the base.

Completed structure ready for casting.

Restoring old Loudspeakers
A complete speaker restoration guide
THE ART OF SOUND – Restoring old loudspeakers with step-by-Step guide

I’m excited to share my latest project—restoring old loudspeakers! I recently came across a pair of 6-inch speakers from an old Sonodyne amplifier system. These speakers were in a heavily worn-out condition, and instead of replacing them with new ones, I decided to take on the challenge of restoring them. It’s a great opportunity to learn more about speaker repair and breathe new life into these classics. To dive deeper into this restoration journey, I also picked up a few more speakers from a scrap shop to experiment with.

These are the speakers that will undergo a revamp and are rated between 30W and 45W.
Spare parts
The most significant hurdle I encountered involved finding new replacement parts for the restoring loudspeaker. It took me over a couple of weeks of searching until I stumbled upon an online store offering speaker spare parts. I managed to find all the necessary parts at a reasonable price. www.burhani.co.in
Cleaning Process

After removing the old coil, paper, and other components, the first step was to seal the coil gap with masking tape to prevent dust and debris from entering. I then began the cleaning process by using a metal brush to remove major rust, glue, and scratches from the speaker basket. Once the primary imperfections were dealt with, I followed up with sandpaper to further smooth the surface.

Painting process.
Here I intended to enhance the look of the speaker with some vibrant color combinations to give it a fresh and captivating look.

There was a higher chance of further rusting in the coil and spider area, due to its prior exposure to moisture. To prevent this, after cleaning the coil gap and its surroundings, I applied a clear coat, ensuring to mask the spider glue area and coil gap beforehand.

Furthermore, I aimed to paint the interior of the speaker basket. So I carefully masked off the cone glue area and spider area on the basket before applying the paint. I applied two coats of black spray paint with a 15-minute gap. (I didn’t apply a primer coat before painting, although it’s generally recommended for achieving a more detailed and lasting finish.)

After finishing the painting of the interior, I completely masked off the inner area to prevent any paint from getting inside when spraying the exterior.

I opted for a red and silver color combination for the set of speakers, so I applied two coats of red color paint to the magnet cover and silver for its basket.
Cleaning Voice Coil Gap
The most critical component—and the true heart—of any speaker is the voice coil. Even the smallest dust particles inside the coil gap can negatively impact sound quality, often leading to an unwanted rubbing sound. To prevent this, it’s crucial to ensure the coil gap is entirely free of dust and debris. In this restoration project, I used a simple method to clean the gap, as these speakers had minimal dust buildup.

I used a 1-inch masking tape and a 1mm thick plastic sheet, folding the tape along one edge of the plastic with the adhesive side facing outward.

Voice Coil

In this post, I demonstrate the restoration of a 5-inch speaker rated at 35 watts. The speaker has a 2mm air/coil gap, and I’ve decided to transform it into a woofer. I selected a two-layer coil, with the former having an inner diameter of 25mm and a height of 32mm. The coil winding height measures 10mm, and the outer diameter comes approx. 27mm. More about voice coil: https://www.iqsdirectory.com/articles/electric-coil/voice-coils.html
Measuring Top Plate Thickness
The top plate is usually made of a ferromagnetic material positioned above the magnet, and it plays a crucial role in shaping the magnetic field around the voice coil, and the coil should align centrally with this plate. Measuring the thickness of the top plate is challenging as it is concealed. To address this challenge, I developed a method to determine its thickness. Using a single strand hookup wire I bend it like, it should enter the voice coil gap and be able to lock at the inner surface of the plate when turning it.


Voice Coil Position
Generally, the coil should sit centrally aligned to the plate for uniform movement and for optimal magnetic interaction between coil and magnetic field. This speaker’s top plate and its thickness are vital components it supports the magnet assembly, guides magnetic flux, and stabilizes the voice coil. Its design and material quality greatly influence the speaker’s performance and efficiency.
Installing the voice coil process requires precision to ensure proper alignment and clearance within the gap. The proper installation ensures that the coil moves freely within the gap without rubbing against the edge of top plate, which also could cause distortion or damage. To tackle this challenging task, I conducted an experiment using a piece of plastic strip as shown below.

The height of my coil winding is 10mm, while the top plate thickness is 5mm. This means that 5mm of the coil will be centered within the top plate, leaving 2.5mm of the coil extending above and 2.5mm below the top plate. The calculation is as follows:
- Coil former height: 32mm
- Subtract 7.5mm (which accounts for 5mm of the top plate and 2.5mm extending inside the magnet) This leaves: 24.5mm for the remaining total coil height along the former.
Inserted the coil into the gap. I then insert the plastic strip with line mark at height 24.5mm placed on yoke. Finally, I used four plastic strips to snugly fit the coil in the gap, ensuring it remained securely centered.


Installing spider

After inserting the voice coil, I prepared to attach the spider to both the frame and the coil. I used a resin and hardener glue combination, which is commonly used for bonding in speaker rapier. I measured equal quantities of resin and hardener, mixed them thoroughly, and first applied the mixture to the basket to mount the spider. Then, I applied the same mixture to bond the spider to the coil.

Attaching Cone

Before installing the cone/diaphragm, I attached the speaker connection terminals to the basket. Instead of using rivets, I opted for screws and nuts and applied resin while screwing for a permanent fix.

I made two 1mm holes in the cone and inserted speaker cable (braid) terminals and applied glue to secure them. I ensured that these holes will be hidden once the dust cap is in place.

Later tested the speaker for the connection continuity.

Then I carefully installed the cone and used a small knife to remove the insulation from the voice coil. I then soldered the coil to the speaker terminal braid and applied bonding to ensure the wires wouldn’t produce any unwanted noise and finally pasted the dust cap.

Know more about loud speakers: https://www.explainthatstuff.com/loudspeakers.html
This is how they finally look like.


Thank you for reading this blog 🙂

A rugged Bluetooth speaker
A Bluetooth speaker in a piston casing
I am excited to present my newest creation: a rugged Bluetooth speaker housed within a motorcycle engine piston. This innovative design is perfect for enthusiasts of both mechanics and music, This speaker not only delivers good sound but also adds a touch of mechanical artistry to any space.

This is the state in which I found the discarded piston taken from the workshop’s waste bin. Its battered surface and worn-out appearance captured my attention, urging me to salvage it and breathe new life into its creative form.
Speaker Housing

I restored the piston by first soaking it in soapy water and then in a thinner solution to remove accumulated grease and burn marks. Afterward, I meticulously polished it using a wire brush attached to a drill.

I trimmed away the unnecessary section of the piston. Note: Aluminum silicon alloys, the material used for the pistons, are easily cut and drilled.

I have two sections of the casing: the upper section will accommodate the speakers, while the lower section will house the battery, module, switch, and power socket.
Switch and power socket


I chose the piston wrist pinhole to house the switch and power socket. To ensure a snug fit, I crafted a 5mm-thick acrylic washer to sit securely within the wrist pinhole.
Parts and assembling

I started by creating a base to mount the battery, modules, and speakers. The battery holder is constructed from a piece of acrylic sheet bent into a semicircle around the battery and fixed to the base. The other side of the base serves as a platform for mounting the Bluetooth module.

In this structure, the circular section will serve as the speaker holder, while two pillars will facilitate joining the two piston enclosures face-to-face.

Next I joined both the battery/module base and the speaker holder and applied black paint to the structure for a finishing touch.

Installing all the components on the piston enclosure was a challenging task due to its unconventional inner space configuration. Thus, a customized structure must be crafted to snugly fit within the enclosure, maximizing the utilization of the available space.
Coloring


To enhance its appearance, I chose to apply matte black paint. To achieve a designer look, I decided to paint black color at the piston ring gap, pin area groove, and piston crown area. So masked rest of the area and applied black color.
I carefully removed the masking tape from the ring gap using a surgical blade and spayed black paint.

These are the components used in this rugged Bluetooth speaker.
Testing

After wiring and assembling, I tested the speaker’s functionality. Since I used a 2W+2W audio output module, the sound output is slightly lower, but the overall sound quality remains satisfactory. Due to the limited space inside, I’m using one 2W speaker and one 0.5W speaker for stereo output.


Cozy LED Lamp
Turning a Car Air Filter into a Cozy LED Lamp
Have you ever considered repurposing automotive parts into unique home decor items? In this blog post, I’ll share an exciting project where I transformed a car’s air cleaner into a stylish and cozy home decor DIY LED lamp. This creative endeavor not only gave new life to a discarded part but also resulted in a cozy, eye-catching light fixture.

Disassembly and Preparation for cozy DIY LED lamp
The journey began when I retrieved my car (ZEN) from the garage following its servicing, and the mechanic presented me with a bag containing the replaced parts. My attention was drawn to the car’s air cleaner/filter. Its unique shape and design piqued my interest, sparking the idea that it could be repurposed into something intriguing.

I started by carefully disassembling the air cleaner. To remove the synthetic fiber paper from the metal enclosure, I applied paint thinner to soften the glue, which made the separation process smoother.

After disassembly, I thoroughly cleaned the inside and outside of the metal case with sandpaper, ensuring a flawless surface for painting. Note: The edges of the metal can be exceptionally sharp, so wearing protective gloves is crucial to preventing injury.
Creating the Diffuser Covers for DIY LED Light

For the diffuser cover, I used a 3mm white glow acrylic sheet. I cut it into two – one for the outer cover measuring 66cm in length and the other for the inner cover at 51cm. ( Keep an extra length of about 3 to 4mm to accommodate any size variations during the bending process. )


To bend the acrylic around the metal frame, I used a metal washer for a snug fit. Despite planning for extra length, the outer cover ended up with a 10 mm gap at the joint after bending. After that, I used a hot air gun to carefully heat and bend the acrylic. Keep the protective film on the acrylic until the final step to avoid scratches.

Similerly, I followed the same procedure for the inner cover.

Both the inner and outer diffuser covers were successfully crafted.
Installing the switch and socket for cozy LED lamp

I drilled a 3mm hole in the upper frame to fit a self-locking push switch. And an acrylic bracket was shaped to secure the switch to the frame. I used a self-locking push switch. To secure the switch to the frame, I shaped an acrylic bracket for the switch.


Assembling the Diffuser and Reflector

To attach the diffuser cover, I used foam pieces to position it perfectly around the frame edge and applied PVC glue for adhesion.


For a smoother LED glow, I incorporated a light reflector made from aluminum packing foil. I carefully positioned and attached the foil inside the frame using synthetic rubber glue.
Arranging the LED Strips

I used a 12v white LED strip, cutting it into smaller strips containing three LEDs each. To prevent short circuits, I applied masking tape at the junctions before adhering the strips. I arranged the LED strips around the frame and tested them by connecting the power supply socket and switch.

After affixing the LED strips around the frame.

Testing the LEDs after connecting the power supply socket and switch, and I ensured everything worked perfectly.


Coffee Mug Bluetooth Music Player
SIP THE TUNE
Welcome to a step-by-step guide to building a coffee mug Bluetooth music player with a creative twist. In this blog post, I’ll show you how to craft a coffee mug Bluetooth music player. Get ready to elevate your coffee experience with a symphony of sound.

Essential Components
Gathering the components for this project is easy and affordable. With a budget of under Rs 300, you can find everything you need both online and at local stores. Additionally, have scissors, a cutter, glue, and a soldering rig on hand for the assembly process.
Coffee Mug: 300ml
Bluetooth Module: CT14 Bluetooth 4.2 F Class 5W+5W
Battery: 3.7V, 1200mA
Speaker: 1.5 inches, 2W
Acrylic Sheet: 3mm Black
Creating the Top Panel
To start, I created a top panel by cutting a 7.5 cm circular acrylic piece, 3 mm thick, using a hole saw drill. Next, I drilled a hole in the acrylic to mount a 1.5-inch speaker. Additionally, I cut a rectangular piece of acrylic, 5 mm thick, to mount the Bluetooth module and battery.

A slot is created in the top panel for micro USB and the module is positioned and secured with screws on the rectangular acrylic.

Next, I took a small piece of acrylic, bent it into a semi-arc shape, and securely affixed it to the rectangular acrylic piece to mount the battery.

Mounted all the essential parts on the top panel.

After that I installed a switch on the panel and created an opening for the micro-speaker. The module produces a stereo output of 5+5 watts. Considering the limited space available on the top panel, I decided to utilize a 1.5 inch and a micro-speaker for stereo output.

Completing the installation of all components and wiring connections.
Finishing

I crafted a cover using plastic folder material to stick it to the acrylic top panel. This process can be skipped by selecting a black-colored acrylic top panel. Additionally.

Finally, I placed a plastic speaker mesh on top of the panel, ensuring provision for charging and the switch.

Before mounting the panel with components inside the cup, I attached craft foam to enhance the sound quality.

This is what the final product looks like.


Miniature abandoned truck model
Creating a realistic miniature abandoned truck model using a toy truck.
“The subject of abandoned rustic vehicles captivates me, immersing me in a world where neglect transforms into artistry. Each rusted and weathered appearance tells its own story, evoking a sense of mystery and intrigue. Join me as I explore the creation process behind crafting a miniature abandoned truck model. Discover the art of model making and the beauty of decay in miniature truck models. Learn the techniques for realistic weathering and rust effects to bring model vehicles to life.”

I’m repurposing a discarded toy from my son’s collection, giving it a weathered, rustic makeover. Inspired by a life-sized abandoned truck I saw near a harbor during my travels, this project captures a moment frozen in time.
Coloring the cabin of the abandoned truck


The cabin interior was completely white, so I began by focusing on the truck’s cabin interior. I applied shades of gray and black acrylic paint to create a realistic weathered look.
Rustic makeover

To give the truck’s body parts a rustic look, I used tissue paper and glued it to the truck’s surface with synthetic adhesive (Fevicol). This is easy method allows for the creation of a rustic texture and can easily modify the texture and color by wetting the tissue paper during the process.

I followed the process considering that horizontal surfaces are more prone to damage from continuous exposure to dust, rain, and sunlight, resulting in more rust compared to vertical surfaces. I began with the roof of the cabin, applying glue with a brush and using tweezers to apply torn tissue paper.


This is how it looks after applying tissue paper to achieve the desired rustic appearance. It created a rough texture on the truck body surface.

To achieve a grainy texture along with the rust surface, I used crushed brown chalk converted into powder. Chalk was chosen for its ability to blend easily with the tissue texture and absorb water, making it easy to modify the texture appearance.

I sprayed water all over the truck, then blew chalk powder onto the wet surface, and let it dry.
Making base to mount the miniature abandoned truck model


To mount and display the truck, I need to create a sturdy base. Initially, I crafted an enclosure with wooden beading in a rectangular shape slightly larger than the truck’s size. I poured a cement mixture into the enclosure, filling it to about 1 inch in height. I placed the truck on top to create wheel imprints. I left it for three days, soaking it in water daily and allowing it to dry to ensure it solidified properly.
Coloring process

I removed any unwanted powdered texture using a brush. This process allowed me to adjust the intensity of the powdered texture.


I began by applying a light wash of brown acrylic paint (Indian Red-10 color), focusing on the tissue paper, using a brush. Then, I applied a darker shade of the same brown for a second coat.

To refine the rust texture, I used darker shades of the same brown color mixed with black. Using a round-point brush (No. 2) and a flat brush (No. 8), I carefully applied these colors. The tissue paper created bumps and scratches during the process, enhancing the realistic rust texture. I also applied a metallic yellow color (Pearl Desert Gold 313) to the edges to achieve a metallic wet look.

Creating Grass and Foliage for miniature abandoned truck

For the grass, I utilized a pre-made grass texture material and applying it to the cement base.


To create small plants, I crushed sponge material using a metal brush to get the right texture. Then, I mixed the crushed sponge with green acrylic paint (Olive Green 281).

I arranged the crushed sponge pieces as small plants on the truck surface using tweezers. After positioning each piece, I applied thick drops of the same green acrylic paint to ensure they stuck securely together.


Making Moss

To create the moss, I mixed sand with green acrylic paint. Then, I used a brush to apply the colored sand to create moss on the surface of the truck.


I used a round stencil sponge to apply a mixture of light green (Greenary 67) and metallic green (Green 264 metallic) colors, giving the grass and plants a wet look. Additionally, I used pre-made plastic plants to enhance the realistic and lush greenery of the scene.
And finally, this is how the miniature abandoned truck model. looks.


Modernizing Vintage Cassette Player
Revamping a vintage cassette player into a modern digital player.
The 1980s were a golden era for music, with hip-hop, new wave, pop, and rock thriving. Back then, cassette players were essential, but in today’s digital world, they’ve become nostalgic relics. My love for cassette players and radios remains strong, and my collection includes the National EKCO-U758, National RX-127OT, AIWA QT-SS-10, and Sony MHC 2500. While all but the EKCO radio are in good condition, finding new cassettes is difficult, leaving them mostly unused. To preserve their charm, I decided to convert these analog treasures by replacing cassette tapes with a flash drive system for digital audio playback.
Cassette
After a few experiments, I settled on a method using spring-loaded connectors instead of conventional tape head (POGO pins). These connectors act as playback and record heads, with corresponding PCB contact plates inside the cassette serving as the interface for data and power.

For the data and pawer interface, I designed a customized PCB plate to fit comfortably onto the cassette’s headspace (pressure plate). Designing and assembling this system was somewhat complex, particularly aligning the POGO pins and contact plates correctly.

To replicate the functionality of an actual cassette, I integrated two flash drives inside, each with four connectors for Side A and four for Side B, enabling both USBs to connect. The contact plate consists totally eight 3mm round pad connectors to power, read, and write to the USB flash drive inside the cassette.

Creating a direct wire connection from the contact plate to the USB flash drive was challenging. To simplify this process, I designed a supporting plate of the same size and linked them using a Berg connector.

I stripped away unnecessary parts from the cassette case and made slight modifications to the pressure plate area to ensure the perfect fit of the contact plate.

And here is how it looks after the complete modification with a digital cassette interface for data and power.
Head (USB flash drive reader)
I’ve replaced the existing tape reader head with a new USB reader head built with a set of four POGO pin connectors.

I soldered four pogo contact pins onto a small PCB, which was positioned to perfectly slot into the original tape head position. To attach this PCB to the drive mechanism, I made an ‘L’-shape using an aluminum angle frame.

Pogo pin head and connecting plate before soldering.
Cassette player modification
Furthermore, my goal is to update the cassette player’s power supply and circuit board, involving a combination of component replacements and additions. I disconnected the original board from its power and other connections and opted for an MP3 module to play songs from the cassette. The original board of this cassette player operates at 7.5V. I directed power from the supply unit board to the Bluetooth modules.
Power and data distribution board

I designed another PCB that serves as a hub for power distribution to the module, features a 5V regulator circuit, and facilitates data transmission from the cassette to the MP3 module.

Speaker

The original speaker was damaged, so I installed a new 2W 3inches speaker that can be powered by the module. Additionally, I added a tiny mobile speaker to serve as a tweeter.
Body and Panel for Modernized vintage cassette player
When it comes to modifying the appearance of the exterior of the player, the first task is changing the scratchy tuning window, so I started by replacing the tuning window glass with a new one. I used a 3mm transparent acrylic sheet and drilled a few holes in it to serve as a grill for the tweeter speaker.


For a modern aesthetic, I embraced a sleek black color scheme for the entire outer body, with minimal red flair. I began by thoroughly cleaning and drying body parts and applying a primer as the foundational base coat.


Following the application of the initial base coat, I proceeded to paint the body panels with a matte black coat.

Final touches and finishing of modernized vintage cassette player
Here are the customized label designs intended for the top panel and tuning range, printed on a non-tearable 120 gsm A3 sticker sheet.


Cassette Card and label design
I designed and printed new U-cards and cassette labels. Check out this website for label and card design guides: www.duplication.com. After visiting this site, I’m excited to see that cassettes are still alive.


Note: the contents and design of the cassette label are solely intended for personal use.
Device used to transfer MP3 files to the cassette.
I created another device to copy the MP3 file onto the cassette.


And this is how the modernized vintage cassette player looks finally…


Fulskil Brand Story
Brand story and development
“Creativity is the key that unlocks boundless possibilities; it is the skill that transforms imagination into innovation and passion into purpose.”
Fulskil.com is a platform that showcases creative interests and projects, providing in-depth insights into their creation processes. The contents here aim to provide comprehensive information that inspires and supports others in their creative endeavors.

The name Fulskil comes from blending full and skill, capturing the heart of what the brand is all about—sharing deep insights and hands-on knowledge behind every creation featured here. It’s more than just a name; it’s a promise to inspire, guide, and support fellow creators through detailed information and practical know-how. Whether you’re a seasoned pro or just starting, Fulskil is here to help you refine your craft and bring your ideas to life.
The shift from Fullskill to Fulskil isn’t just about shortening the name—it’s about making things simpler, clearer, and more approachable. True skill doesn’t have to be complicated. Sometimes, simplicity makes learning and creating even more powerful. With Fulskil, the focus is on making expertise accessible and creativity limitless.

The elements
The Fulskil logo blends two key ideas—skill and completeness. The rectangular box symbolizes wholeness, while the pencil and screwdriver represent creativity and craftsmanship. The pencil stands for ideas and design, while the screwdriver reflects hands-on skill and precision. Together, they capture Fulskil’s mission: to provide complete, in-depth insights and hands-on guidance, empowering creators to bring their ideas to life.

Logomark construction
The logo mark primarily features a rectangular stroke incorporating the first letter ‘F’ of Fulskil within the stroke.

Typeface

Brand color
The gradient from light to dark gray symbolizes the journey from start to finish, serving as the primary logo color. Deep sky blue adds inspiration and endless possibilities, while Atlantis green represents creativity and growth. Together, they create a dynamic and purposeful identity for Fulskil.

Final logo


Typography for brand fulskil

Icons and Favicon

Social media template in the Fulskil brand identity.


